Farmhouse Kitchen Pantry Organization
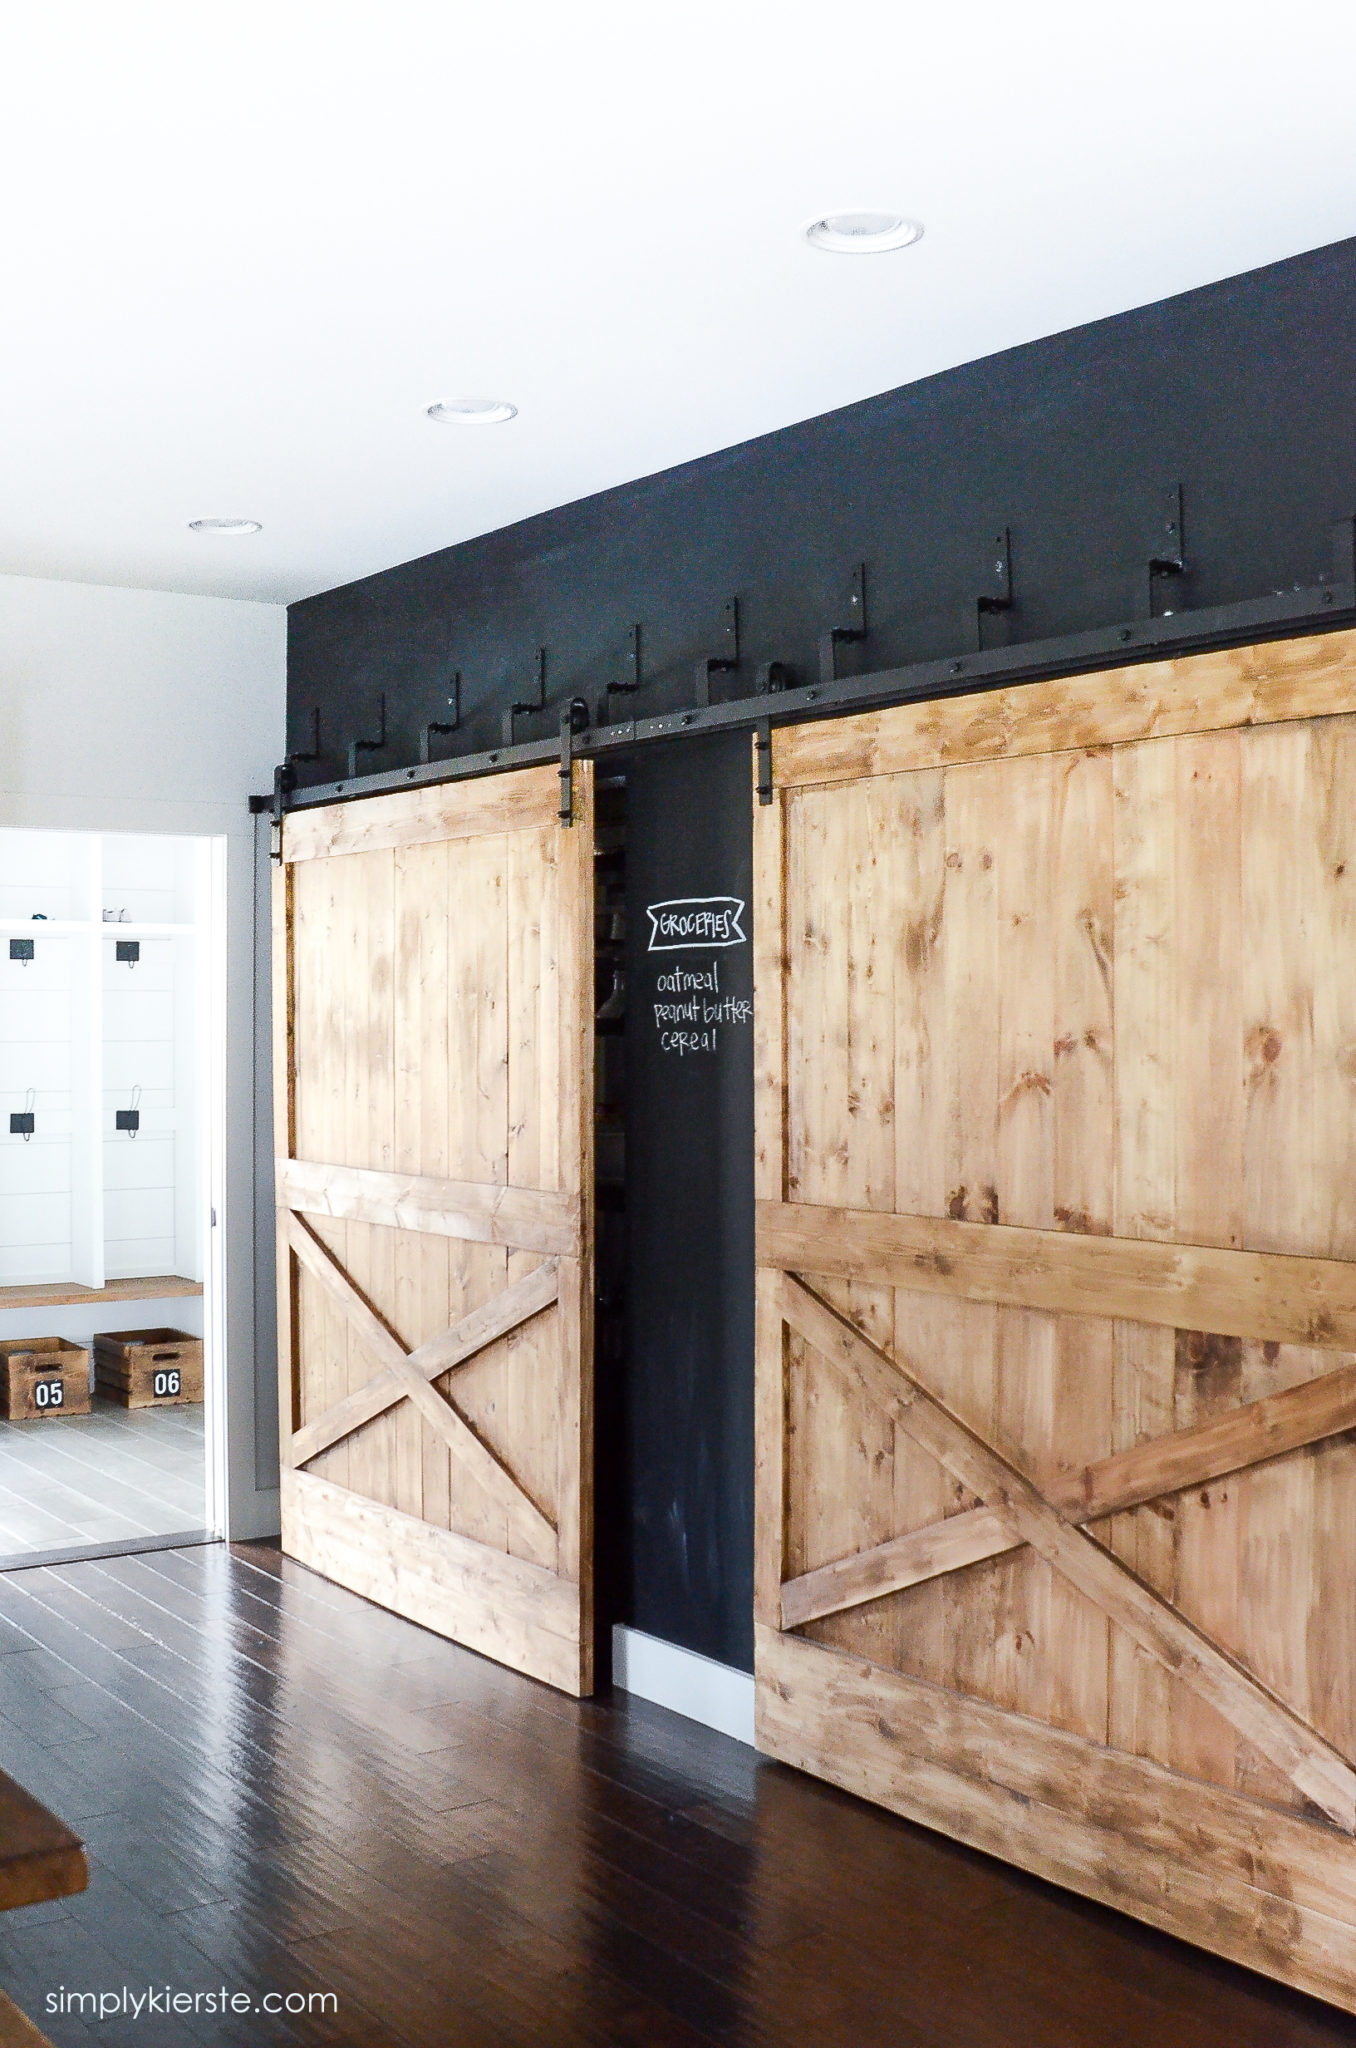
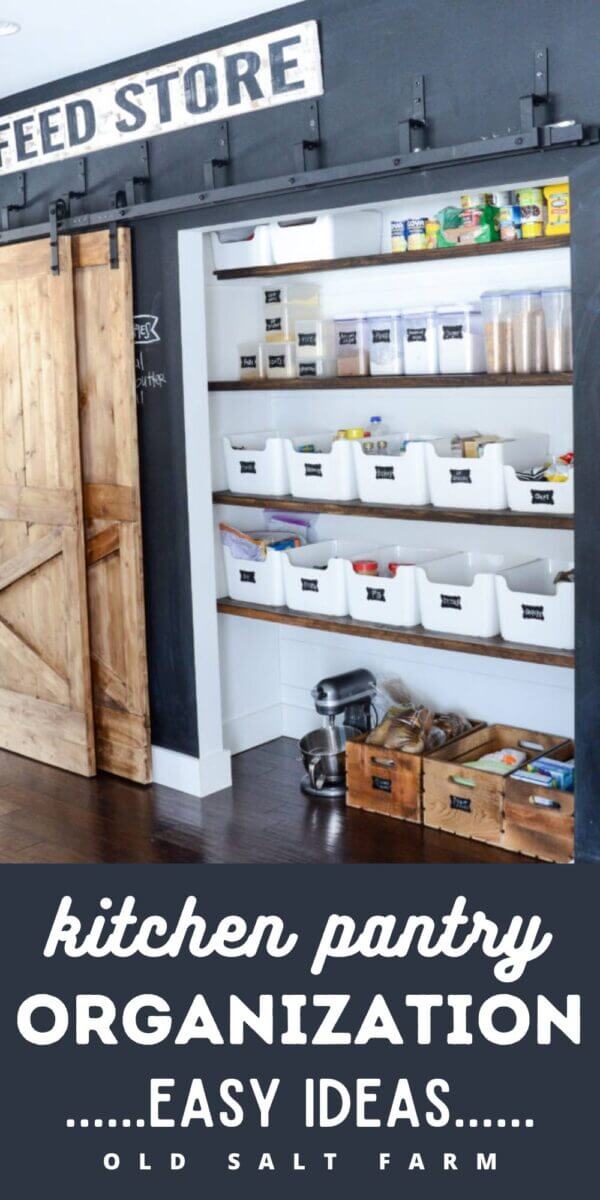
When we began designing Old Salt Farm, we started with a set of house plans that I found after hours and hours of searching. I liked the plan a lot, but there were quite a few things that I wanted to change, including the pantry. The plan had a very small pantry, and we needed it to be much larger. I originally wanted a walk-in pantry, but it just didn’t work with the plan without making major structural changes. Instead I created an entire wall of pantry–14 total feet consisting of two 7 foot sections. I love how much room there is, and the double set of barn doors add the perfect touch to the whole space. It ended up being exactly right! Once we moved in, I was able to do some kitchen pantry organization, using some of my favorite containers and crates. I’m excited to share all the details with you!
Affiliate links are included below for your convenience. If you click on a link and make a purchase, I’ll receive a small commission at no extra cost to you.
Kitchen Pantry Design
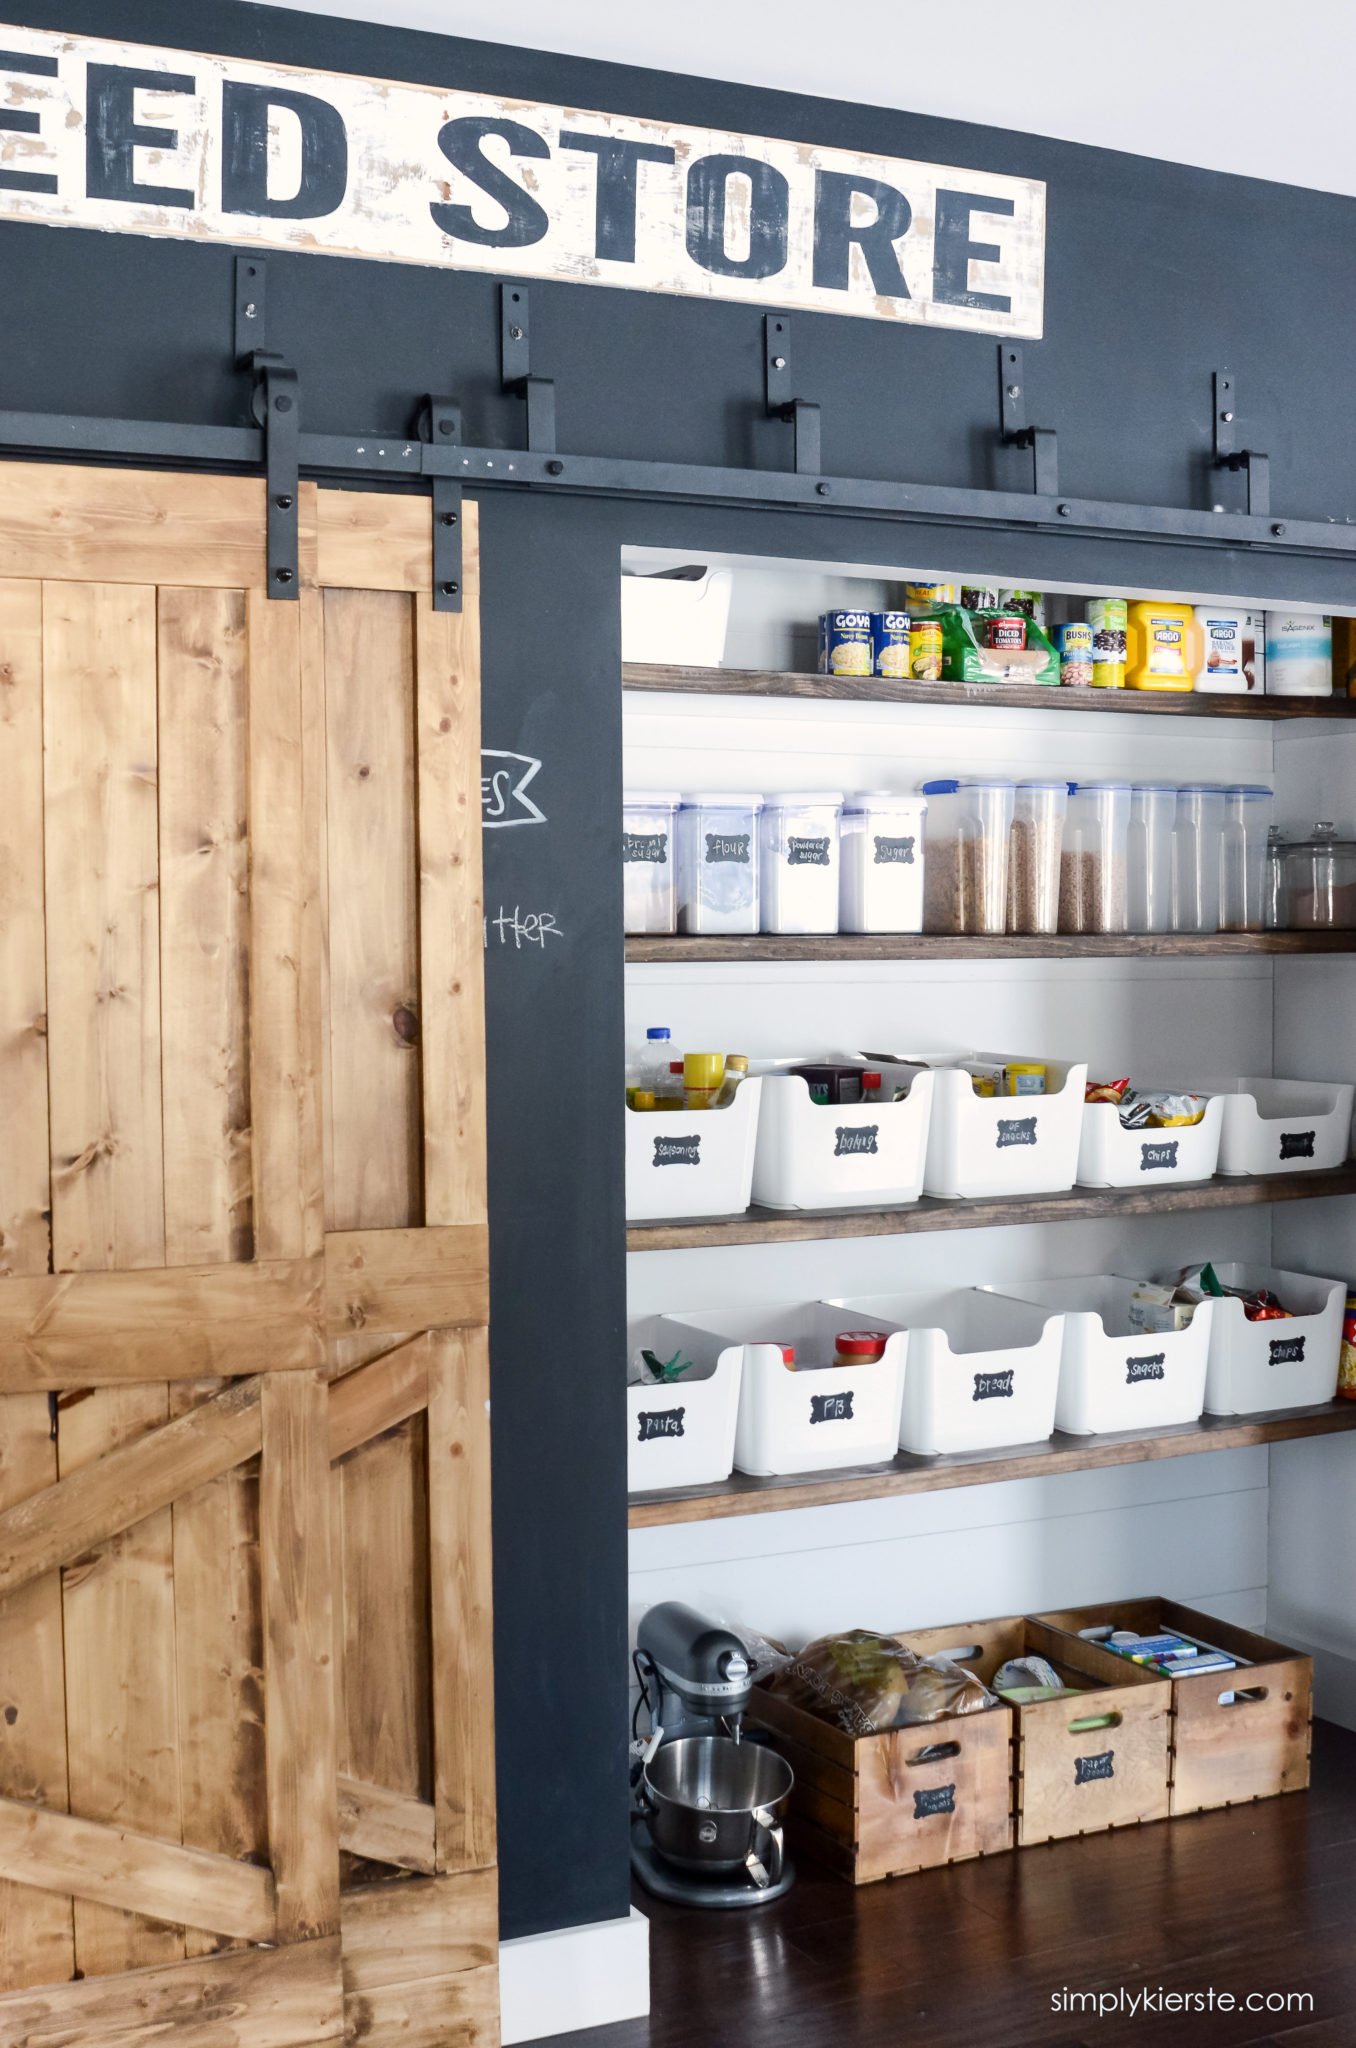
First up…the barn doors. We built them to fit once the drywall was finished, but we did prepare ahead of time by having the framers put in extra studs where the hardware would be. Each door is nearly seven feet long, and they’re heavy, so they needed all the support we could give them. They’re stained with Minwax’s Provincial, but I put it on pretty lightly, then rubbed it off immediately, so it would give it more of a weathered look.
You’ll notice that there isn’t a wall on either side for the barn doors to roll across, so these are actually called bypass sliding barn doors. It means they slide in front of each other, which makes it nice when you want a sliding barn door but don’t have the wall space! The doors needed bypass barn door hardware, but we found some for a really good price. (Here’s another great one! )
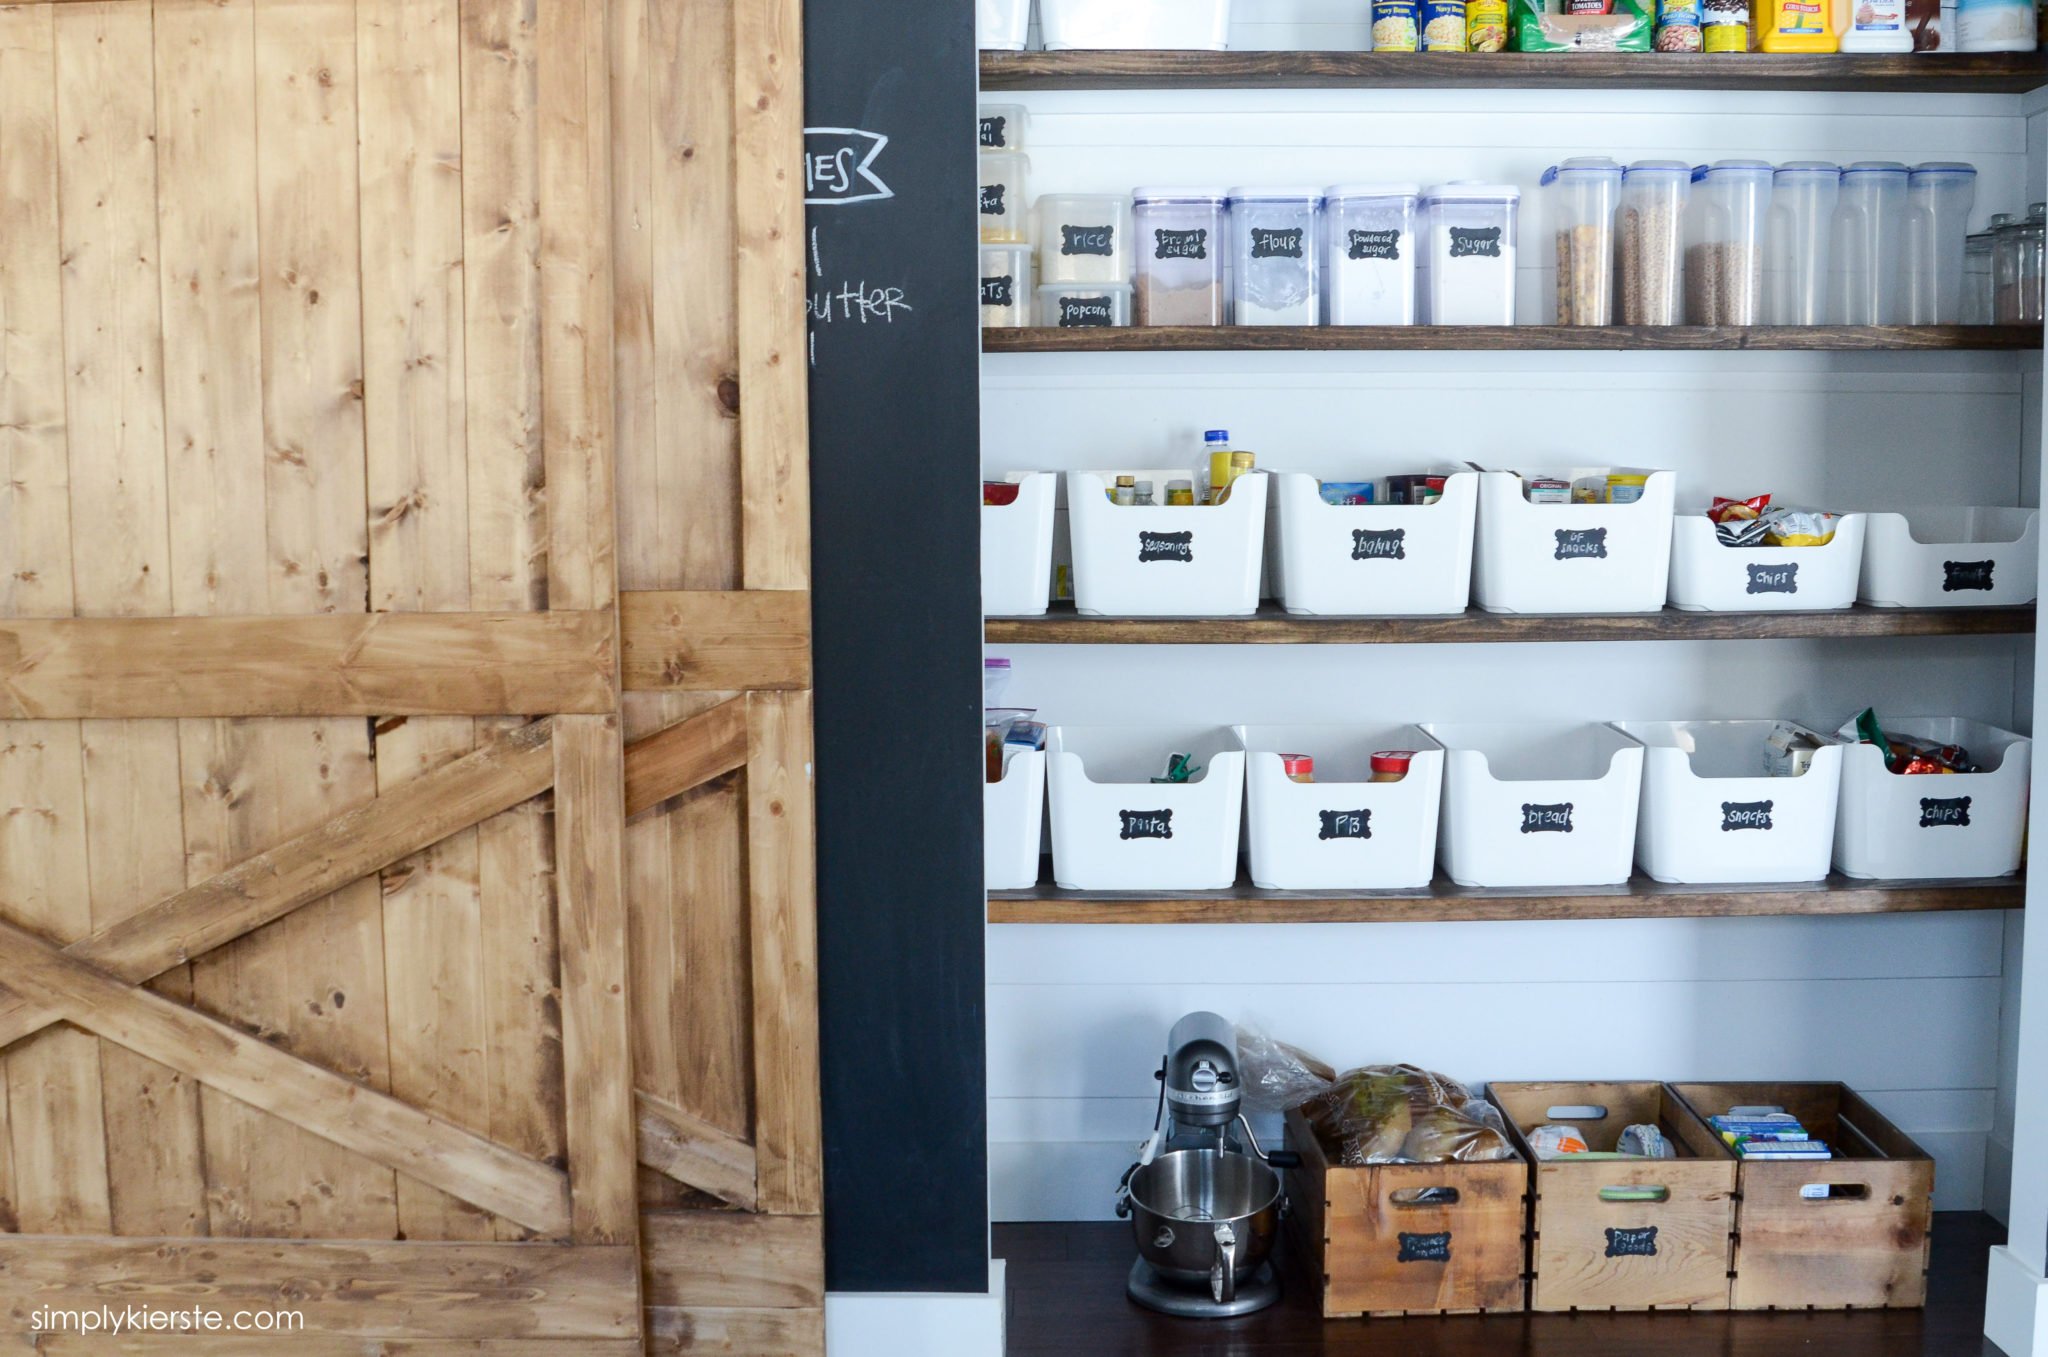
We put shiplap on the inside walls of the pantry–I wanted to give it a little extra something, and I knew that would do it!
I decided to stain the shelves instead of painting them white, just like in our laundry room. From past experience, I know what a pain it is to try and keep white shelves white and clean!

Kitchen Pantry Organization
I have room for everything I need–I use the white bins for all of our school lunch supplies, like chips, fruit, and snacks, plus bins for bread, seasonings, baking supplies, pasta, and more. The clear containers are for cereal, flour & sugar, oats, rice, beans, popcorn kernels, etc. I LOVE these white bins. LOVE LOVE. They come in two different sizes, and they’re both awesome. They are a great size, fit well side-to-side, and are super easy to wipe out and clean. I like the shorter ones for the kids’ lunch stuff, because they pack their own lunches, and it’s easier for them to reach in and get what the need. The taller ones are nice because they hide everything that’s in there, just making it all look nice and neat!
I store a few canned goods on the very top shelf, plus a few larger containers. We keep most of our food storage in the basement, so I can keep these shelves open for the things we use the most.
I used these chalkboard labels for the fronts of all my bins and containers, and I LOVE LOVE them. I have to be able to wash labels I use, and these go in the dishwasher! Plus, if I change my mind about what I want in the containers, it’s super easy to wipe off the chalk (I use a chalk marker to make it last longer) and start again.
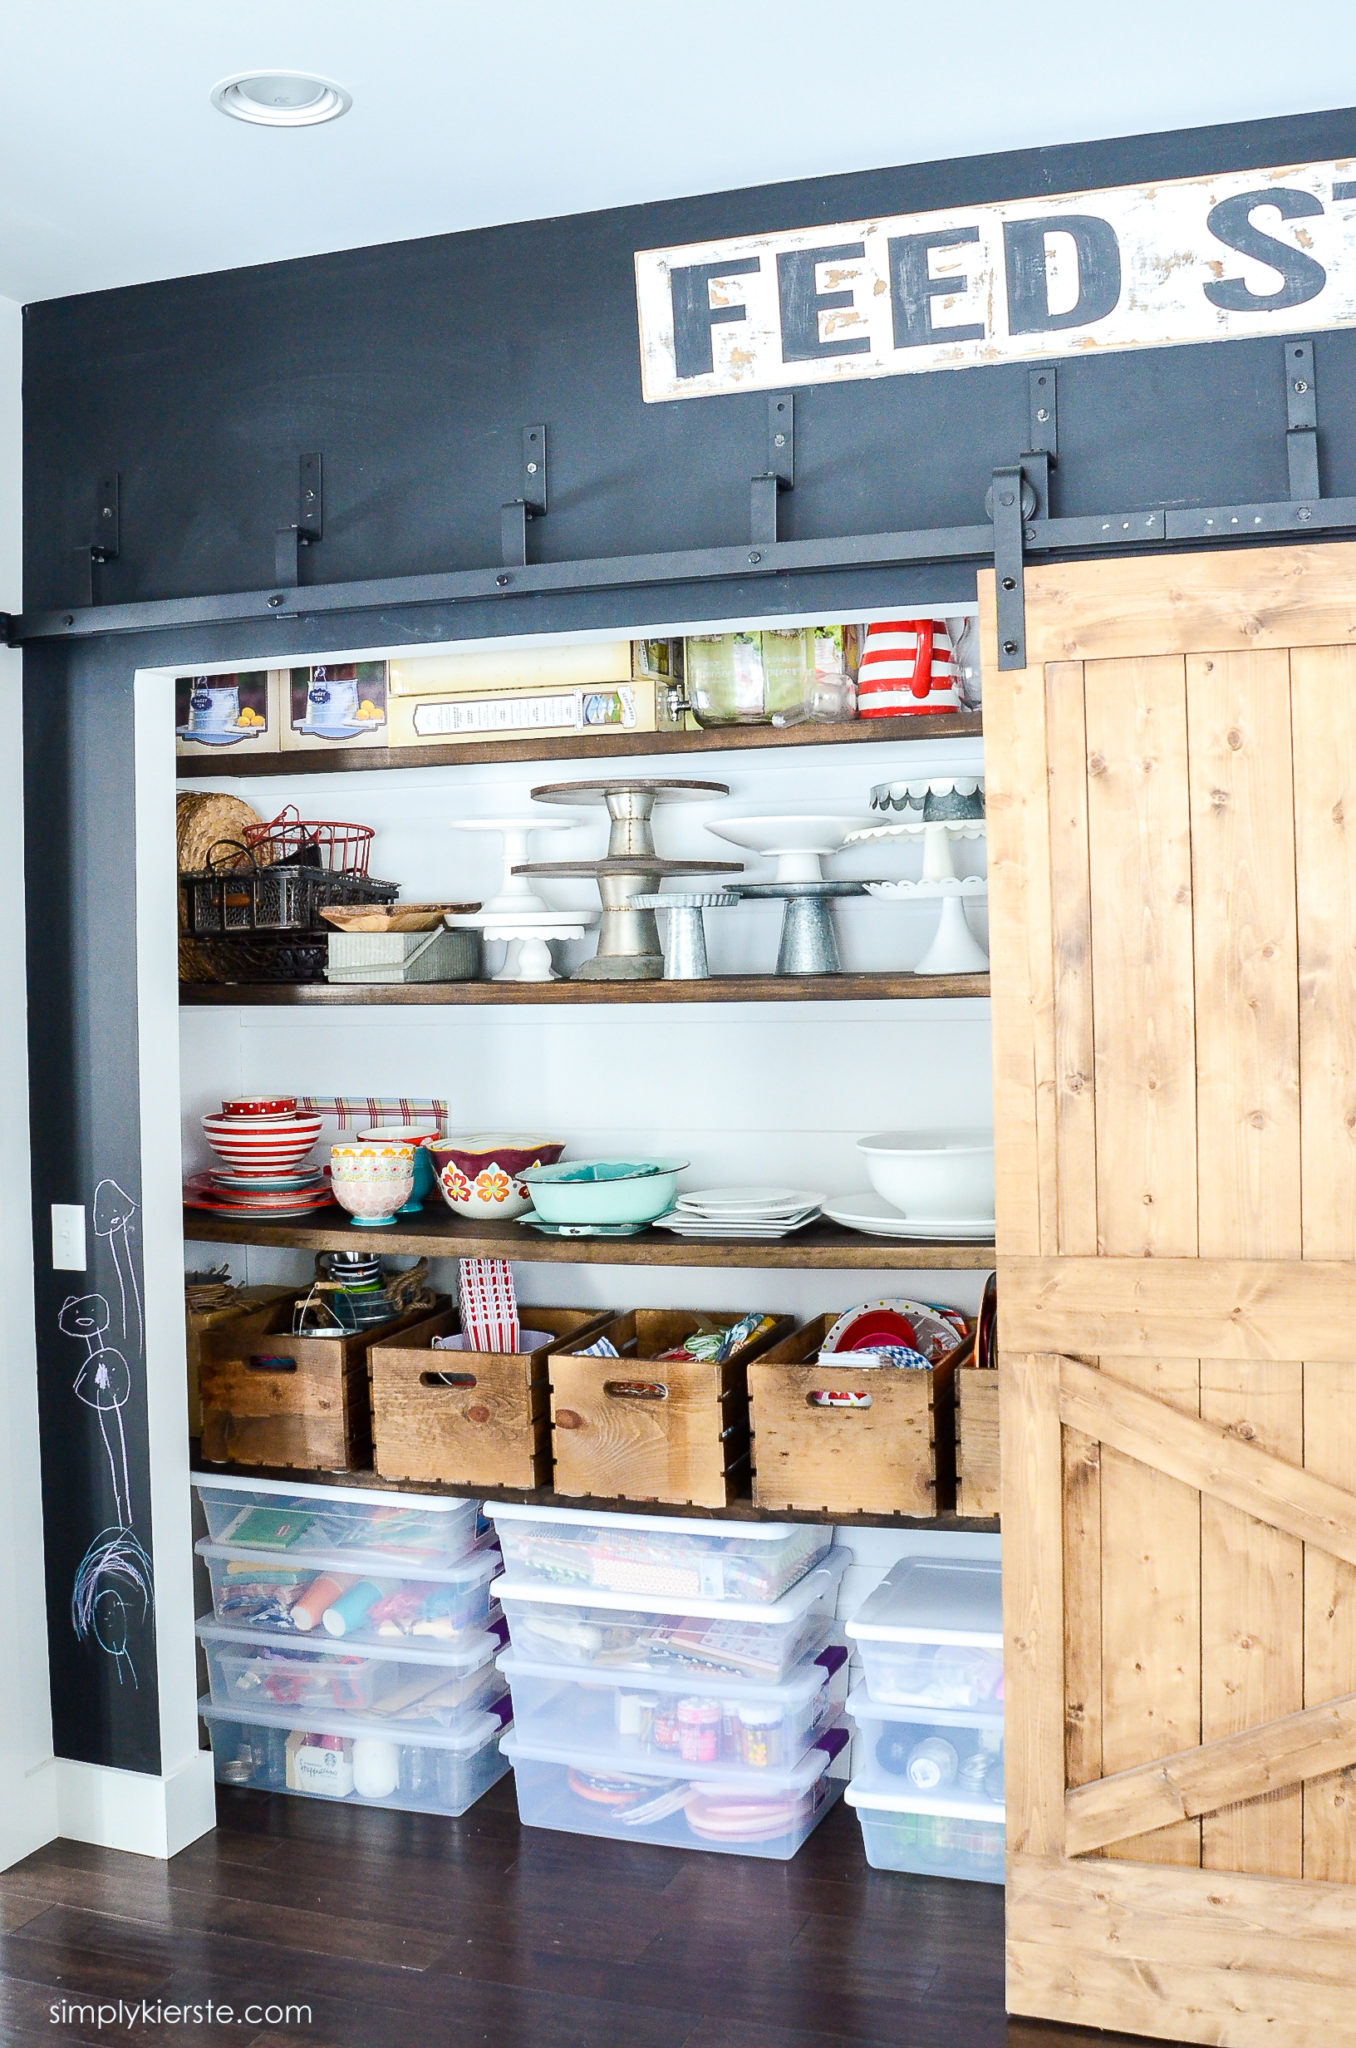
The crates are perfect for potatoes, onions, paper goods, and juice boxes for my kids’ lunches. I have room for a couple more if I need them.
The mixer was originally intended to go on a shelf, but I forgot to measure it before we installed the shelves, and it’s just about 1/4 inch too tall! I was so mad at myself for forgetting to do it–lesson learned! It still works where it’s at, so it’s fine, but still!
The other side of the pantry is for all of my serving dishes, cake stands, party supplies (paper straws, paper plates, napkins, etc.), baking items like sprinkles and cookie cutters, place mats, beverage containers, milk bottles & mason jars (most are in the basement, but I keep a few on hand here), pails, and more. I absolutely love having it all right at my fingertips, and I use it daily.
I absolutely love everything about the barn doors and pantries! Kitchen pantry organization makes such a difference, and worth the time it takes, I promise! Once it’s done, it’s so much easier to maintain and stay on top of.
If you’re curious about the chalkboard wall, I wrote a whole post about why I love it so much! If you have any other questions, leave it here in the comments, or email me at simplykierste@yahoo.com, and I’ll address it in my post!
STORAGE CONTAINERS SOURCE LIST (affiliate links below)
White bins (I have both sizes)
Clear plastic containers with lids
Crates: DIY
Feed Store sign: DIY

Other posts you might like…
- Easy DIY Farmhouse Shelves
- Getting Organized: Things to Throw Away, Donate, or Recycle
- Farmhouse Paint Colors–Fixer Upper Style!
- DIY $15 Wooden Blanket Ladder
LOVE IT! You are so talented. Thanks for sharing. Where did you find the white bins. My pantry needs a redo.
Thank you, Katherine! All the sources are at the end of the post! :)
I’m sorry, I didn’t see the instructions to hit next — I guess I was just overcome with excitement. Thanks so much.
No worries at all!! Glad you found them! :)
Hi there. The link for the white bins doesn’t seem to be working.
I’m sorry about that! Try this one: http://www.ikea.com/us/en/catalog/products/40234709/
Thank you for sharing.
You are so welcome!! xoxo
I could not believe my eyes when I saw your blog post update! My sliding barn wood door project has just been completed and I was trying to find more uniform/matching storage solutions! Can’t wait to check those stacking plastic bins out at IKEA! What I love that we did in our pantry was lining the shelves with these: https://www.samsclub.com/sams/alera-shelf-liners-for-wire-shelving-units-48-x-24-4-pack/prod2170306.ip?xid=plp:product:1:2
They are super sturdy and makes sliding things in and out a breeze. Plus, all the extra pieces left over from cutting have been used in the bottom my wire baskets or drawers. GREAT for refrigerator liners because they can be removed and cleaned so easily. I already ordered my chalk board labels, too…Thanks to you and your fantastic ideas! So glad you share them with us Ü
Yay! So glad the timing was right!! and thank you for the tip on the shelf liners!!! xoxo
Great post and pantry! Can you tell me how deep your pantry is from the trim molding to the back? Weird I know but I’m in the middle of a kitchen design from scratch (by me!!!!) and I wanted to get some perspective before I start drawing final designs.
Sure—it’s between 2.5 and 3 feet. I’m not home right now to measure exactly, but I would say it’s right in between there.
Your home is decorated beautifully. I love farm house style. It’s classic. My kids would love a chalk board wall. I might just do one in our “art area” we have designated in one room of our home. Did you do a post on your feed store sign yet? I’m just wondering about the font. I was thinking I might put it over my pantry door.
Thank you so much! I haven’t done a post on my Feed Store sign yet, but I actually bought the vinyl stencil from an etsy shop— https://www.etsy.com/shop/ErinsCraftDays. I made it just like this sign, with instructions for the rest of it: https://oldsaltfarm.com/2016/09/diy-framed-wood-farmhouse-sign.html
Hope that helps!! xoxo
Hi Kierste!! Your pantry looks amazing!! I went and bought the large bins from IKEA and they’re awesome!! Thank you. I also just ordered the chalk board labels and markers from Amazon using your link. I’m so excited!! I was wondering where you got your flour and sugar containers. I love how they all are the same height and look so nice lined up together. Also, where did you get the clear lids on the floor under your shelves? Those look like such a perfect size for my pantry. Thanks so much for taking the time to answer all of our questions!! You’re amazing!! :)
Whoops–the bins with the clear lids on the floor of your pantry!! Thanks again! :)
Hi, Annica!
I’m so glad you love the IKEA bins too! Hooray! The containers I use for flour and sugar I bought at the Container Store, but I looked quickly and found them on Amazon too! (affiliate link: http://amzn.to/2qwP4vj) I think I’ve even seen them at Walmart!
I got the bins on my pantry floor on Amazon too…love them so much! :) (affiliate link) http://amzn.to/2oYQlu1
Have a great week! xoxo
Thank you so much!! You’re absolutely wonderful!! I can’t wait to get this pantry of ours completely organized. You’re darling!!
Thanks so much once again! :)
I LOVE your pantries and barn doors and am doing something similar in my house, using yours as inspiration. Would you mind sharing what kind of wood you used for the shelves and how deep they are? Did you just use wood supports on the back an sides to hang them? I want to support them enough so they don’t sag when I load them up. Thank you!
Oh, yay! I’m excited for you! The actual shelves are 17 inches deep, and from the back of the pantry to the very front, it’s 30 inches. We used plywood that I stained, then added a face frame around the edges. For supports, we put furring strips all around the back and sides, and they act as a ledge that the shelves sit on. We cut a little notch in the face frame, so it would sit on the furring strip/shelf. If you need a visual, let me know, and I’ll send you some pics!
Thank you! I’ll let you know if I need a picture when we get to that part. I really appreciate the reply.
Absolutely love your barn doors and beautiful pantry!!
Thank you so much!!