How To Paint a Piano
Find out how to paint a piano the easy way! Completely transform an old piano and give it new life with this step-by-step tutorial.
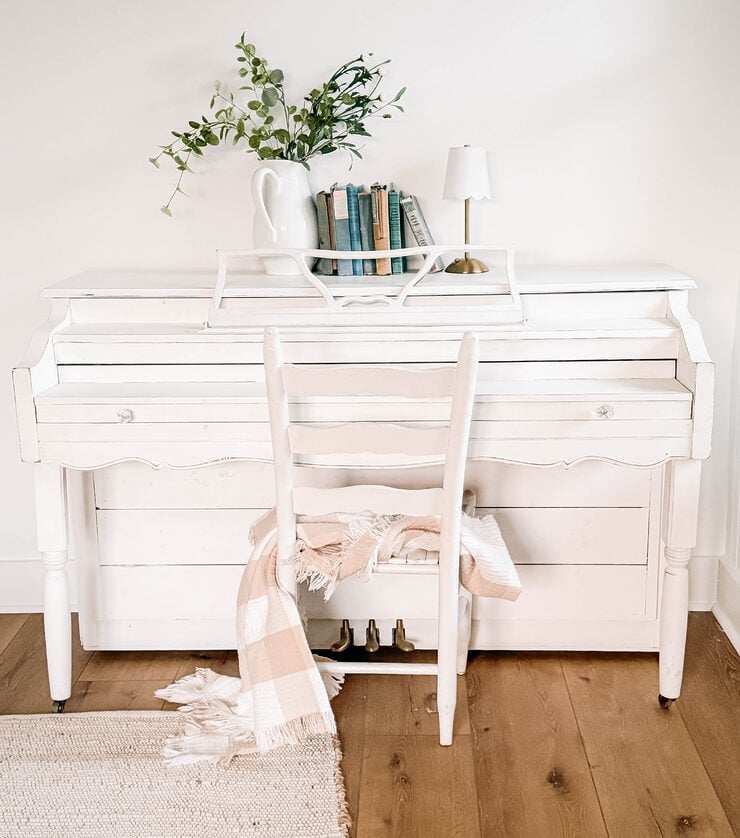
When we were building Old Salt Farm, we lived in temporary housing. Most of our things were in storage, and we kept just the basics to live with. We might be sleeping on futons, and we don’t have a real kitchen table, but we have a piano! As a pianist, it was never really a question if it was coming with us or not, and now that my kids are playing too, we found the space. It’s actually the piano I learned to play on, and it has a lot of sentimental value. It just needed major makeover–mostly because it just wasn’t my style, and the wood was an orange-y color that didn’t go with anything. So I decided to go all in–not just paint, but a update it with whole new look that would match our new farmhouse-style home. Zero regrets–one of my favorite painting projects to this day!
If you have a old piano that needs a little love, especially one that has a laminate or shiny surface, this project is for you. It was painted in a day, right in my family room, and the whole process was much easier than I could have imagined.
Note: This was originally written in 2015, when I painted the piano. After two more moves and 11 years later, it’s now with us at Cottage on Blackberry Hill, in the library. Pictures below!
Table of contents
This post contains affiliate for your convenience. Please see my full disclosure.
Details
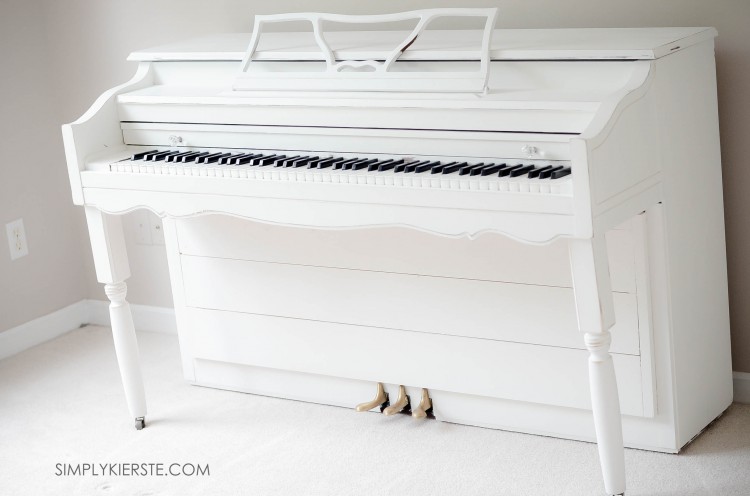
Yes, I can almost hear the gasps from some of you–she painted it, AND she nailed wood to it? I would not do this to any collectible piano, a Steinway, or a piano that you aren’t sure about. Because once you start…you can’t go back. However, I was sure, and I was ready to take the chance. It didn’t affect the sound at all, and I took great care to not damage anything internally. I took the panel off the front of the piano in order to add the wood planks, so the inside was always protected. Let me just show you the before picture, and you’ll see how much of a difference it is!
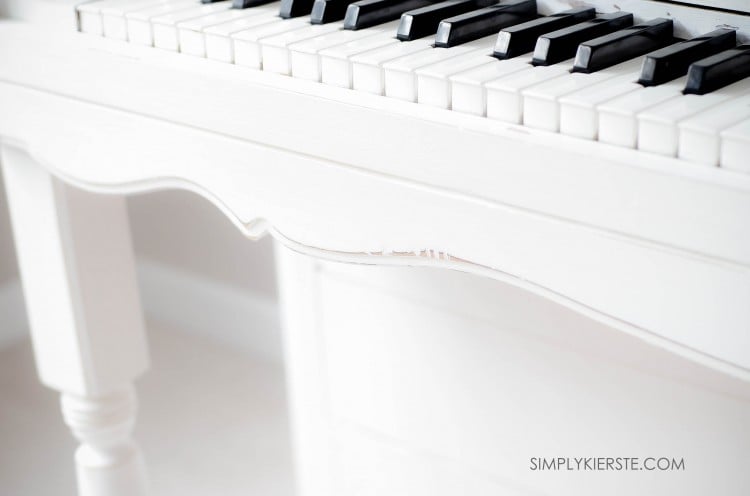
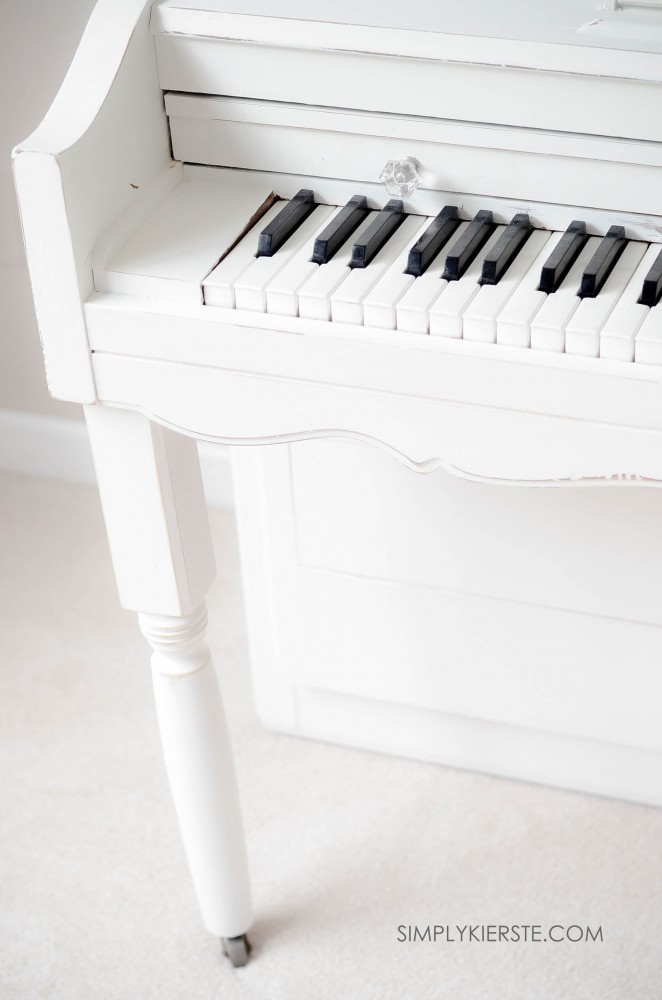
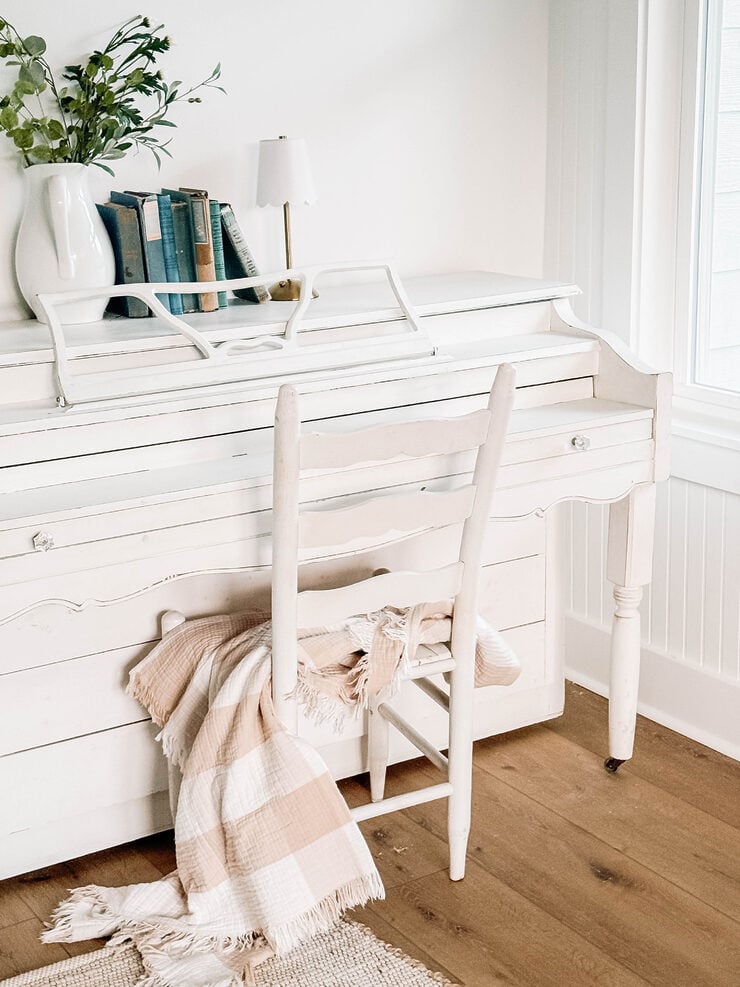
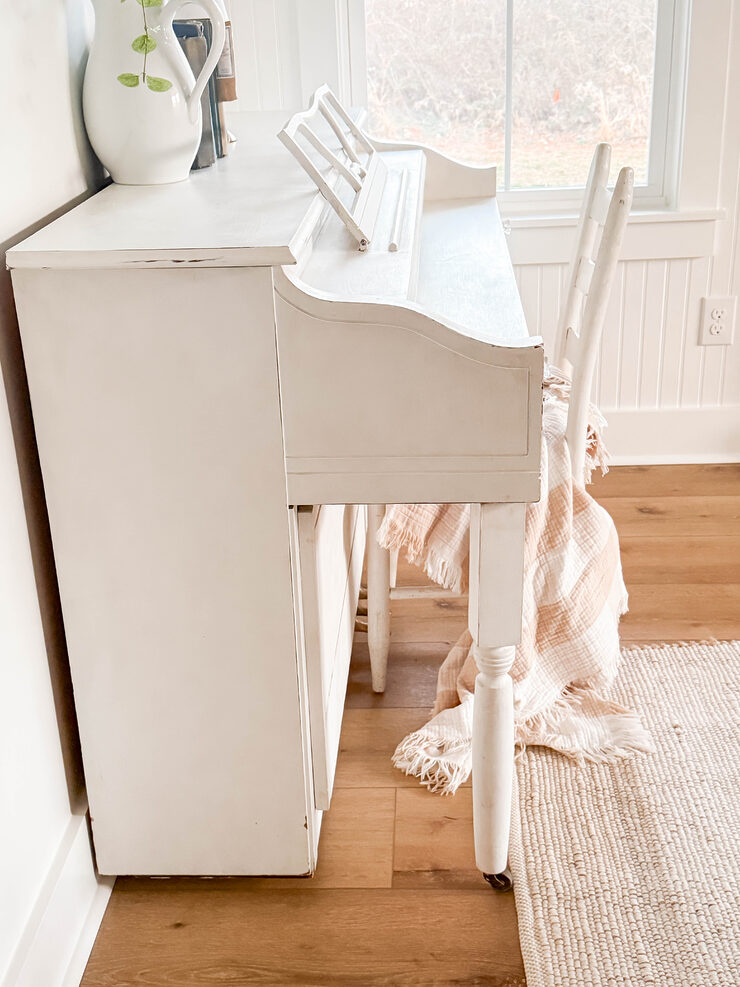
I changed the piano legs, added wood planks to the front panel, painted it with chalk paint, and added new hardware. The result is a complete transformation, and I almost can’t believe it’s the same piano!
I highly recommend chalk paint when painting a piano. You don’t have to move it from it’s current position–just move it away from the wall, put it up on wood blocks, and add a drop cloth. It also requires no priming or sanding, which is HUGE. My piano had a smooth, shiny surface, and I would have been sanding for days and days to even get it close for a latex paint. It dries quickly, and you can add a second coat in less than an hour. I used Annie Sloan, Pure White. Another great option is to use BB Frosch Chalk Paint Powder. You can add it to any color latex paint, which just opens up the door if you’re looking for a specific color!
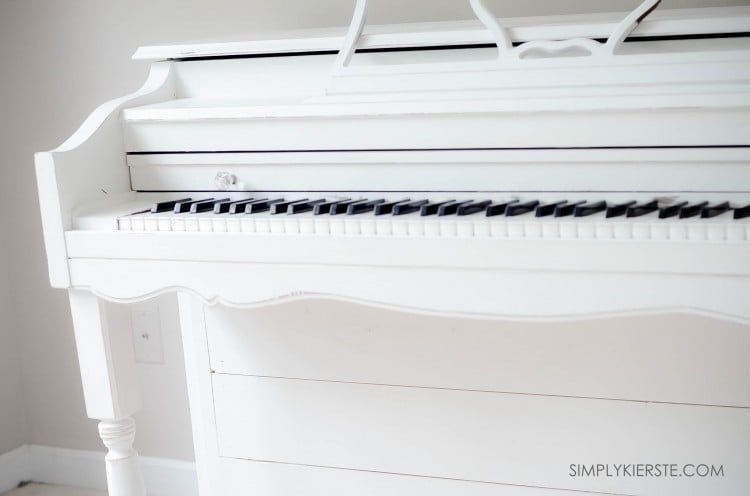
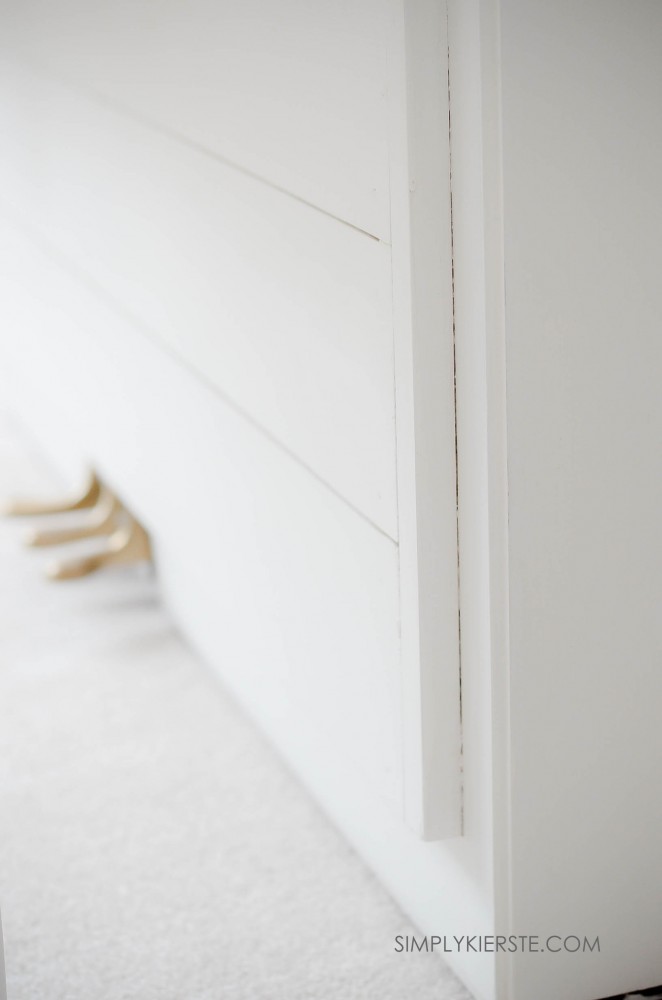
The front panel flays flat, but it doesn’t cover the whole front of the piano. That’s why the planking doesn’t go all the way to the edge of the piano–it still has to come off and on. I removed the front panel, added the wood planks, and then put it back on. I used 1×6 pieces of wood, so it sticks out about 3/4 of an inch.
I bought knobs at The Home Depot for around $3–what a bargain–and SO perfect!

After painting, I distressed a little bit before adding the wax. I didn’t want it super distressed, but I loved the way the wood came through when I did. It adds just a little more character and depth.
Supplies
- chalk paint
- wax brush
- chalk paint wax or matte clear topcoat
- painters tape (Frog tape)
- lint-free cloths
To add planks/shiplap:
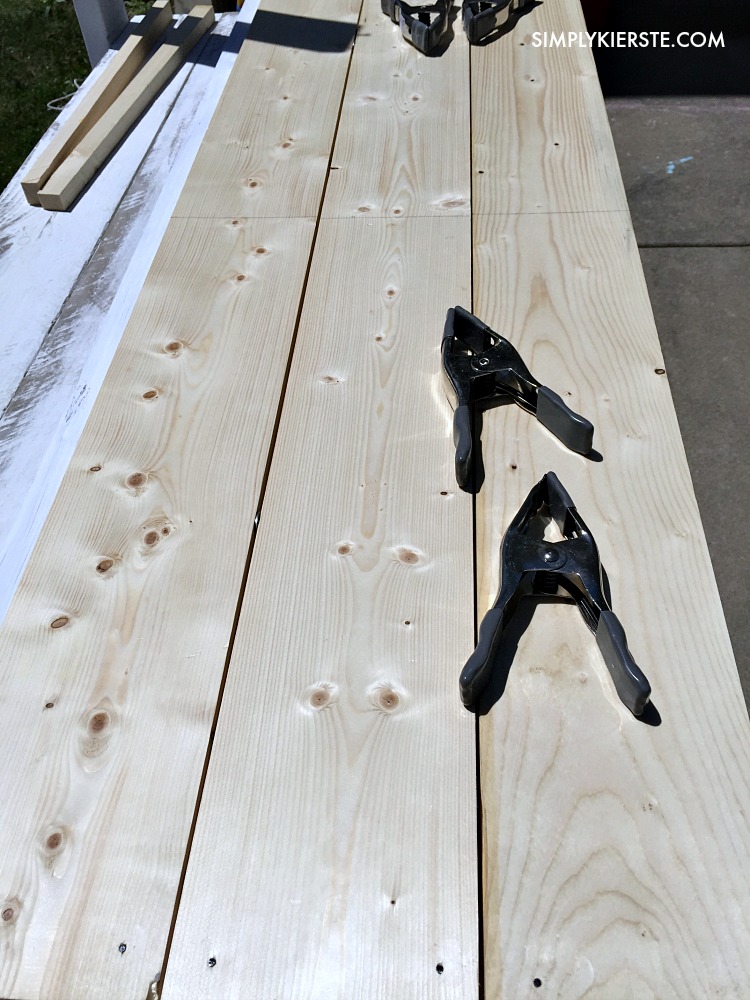
- 1×6 wood planks
- wood glue
- 1 1/4 inch nails
- 200, 300, 400, and 600+ (optional) grit sandpaper
Directions
Clean your piano well with a mild soap or good dusting–you don’t want any dust, stickiness, etc. The paint will adhere much better. One of the most important steps is to tape off the stuff you don’t want paint on. I used Frog tape to cover the keyboard, trying to press it down as close to the keys and wood behind the keys as possible, so I could still paint behind there. I also taped off the pedals. That was all I needed to tape off, but look carefully at your piano, in case there’s something else. I also removed the music holder, and painted it separately.
I used Annie Sloan chalk paint (Pure White). I used a tiny brush for the corners, and inside the scrolls, but otherwise I used an Annie Sloan paint brush. You don’t have to use hers, but it should be made of natural bristles. I also love BB Frosch Chalk Paint Powder, which you can add to any color/brand paint, but I already had the Annie Sloan, so I used it. I did one coat of paint, then removed the front panel to add the wood planks. UPDATE NOTE: 11 years later, there are even more products on the market are even less expensive and you can find them at your local hardware store. My most recent chalk paint project, a dresser in my girls’ room, I used Rustoleum Chalk Paint. No sanding, priming, or topcoat necessary.
If you are not adding shiplap, you can skip ahead through the next few instructions.
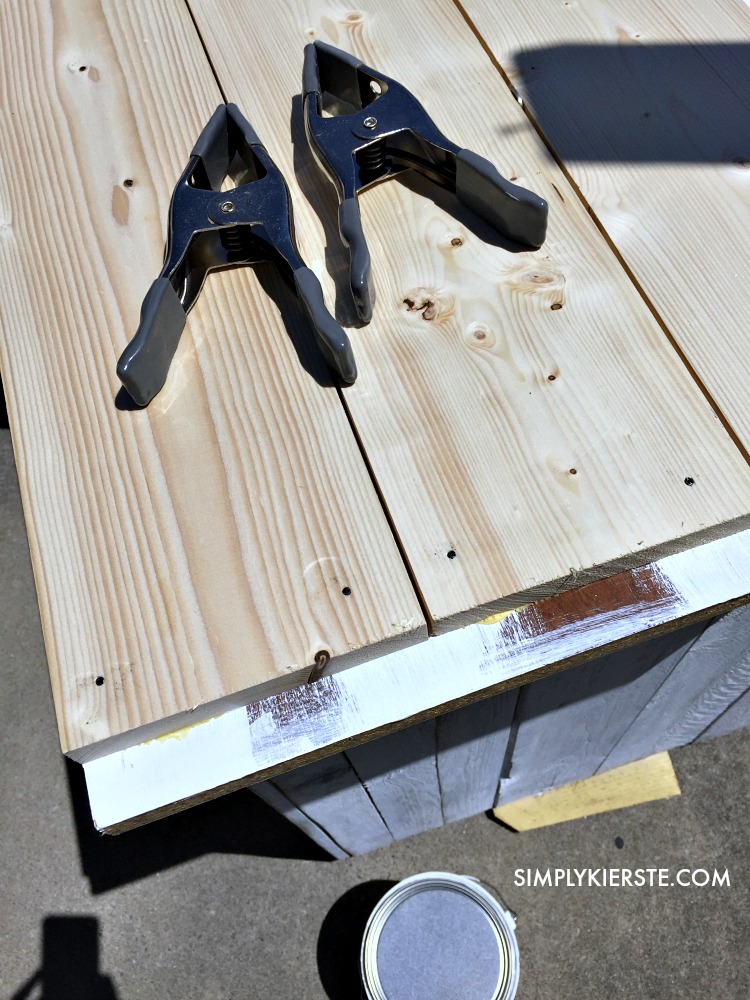
I measured the panel, and it was 22 inches in height and 51 inches in length. I needed 3 of the 1×6 planks to fit the height, and then I had to cut the fourth plank to fit the remaining inches. I put that at the top of the panel, because it would be hidden behind the scroll-y part of the piano underneath the keyboard. I only cut the planks to be 49 inches in length, because I wanted to leave a 1 inch space on each end. The edges of the planks were rough after being cut, and to cover them and give it a finished look, I added a 1 inch piece of wood on either end.
Once the wood was cut, we used wood glue and nails to attach it to the panel. I used a nickel in between each plank to give it the right amount of space. Clamps kept the wood pieces in place and secure while the wood glue dried.
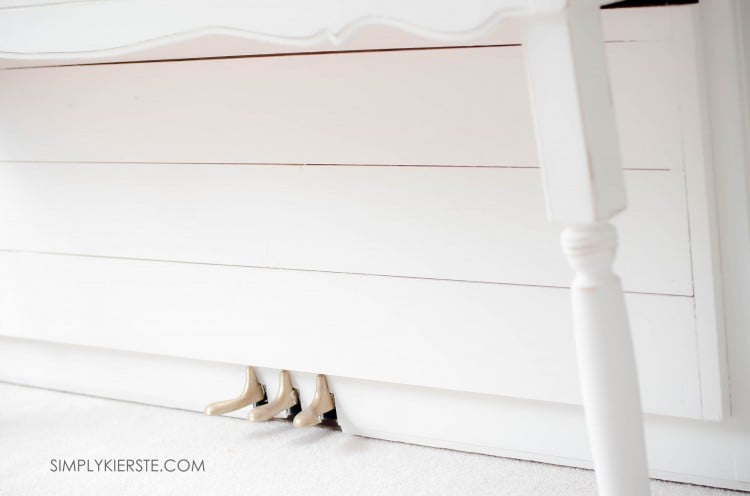
After the glue was dry, I slid the front panel back into place. At this point we also removed the legs and added the new ones, which we found at The Home Depot for around $15 each. There was a scroll-y part on them that I didn’t like at all, but I was okay with it, because they would end up being cut off when we cut them to length. All the rest of it I liked, and thought it was the perfect choice for this piano. The legs are just screwed in, so it wasn’t hard to remove the old ones, and screw the new ones in.
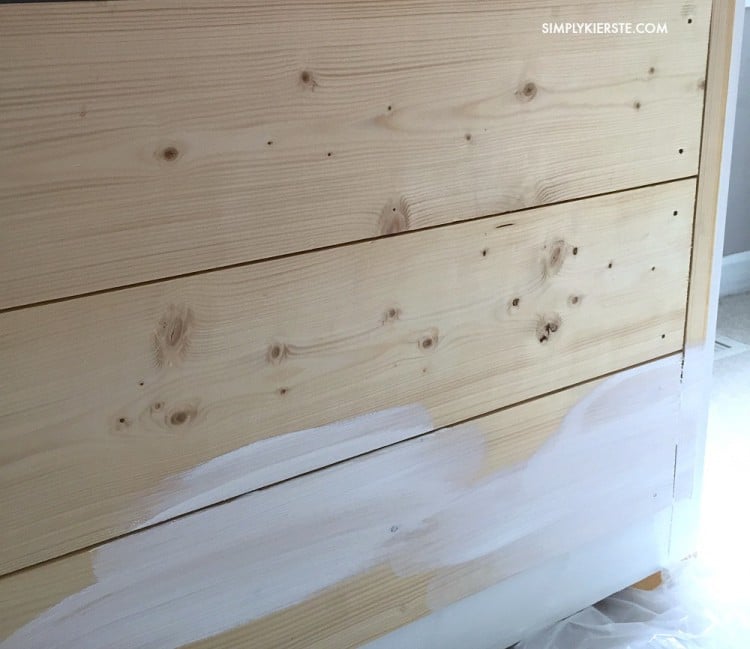

I painted an additional 2 coats of paint to get the coverage and look that I wanted, waiting until the paint was dry before adding the next one–usually 30-60 minutes.
To achieve a smoother look, and minimize some of the brush lines, I used a 200 grit sandpaper, and then repeated the process with 300 grit. I also used the sandpaper to distress the edges and corners, and remove the paint in those areas. If you want an even smoother look, you can use a 400 grit after that, and for no distressing and super smooth surface, a 600+ grit. You’ll need at least 2-3 coats of paint to do that much sanding though, or it will come off. Lightly sand–the chalk paint comes off very easily. Once you’re finished sanding, wipe off all of the excess dust.
I used the chalk paint finishing wax by BB Frosch, and I ADORE it. It goes on like butter. Seriously, so easy to work with! I used one whole container for my piano, which is a spinet, and it was just exactly enough. If you have an upright piano with a higher back, I would get two for sure. You might even want to get two to be on the safe side. Use a large craft stick to apply a small amount of wax to your wax brush, then apply it evenly over the painted surface. You can also use a lint-free cloth to apply it Work with about 12-15 inches at a time, and then go back over that area with a lint-free cloth to remove the excess wax and buff it smooth. It shouldn’t be tacky or sticky–buff it until it’s not.
The last step was to add the hardware, which I found at The Home Depot for just a few dollars. It was the perfect finish!
Now I just sit back and stare at it all day long. I find myself passing it, and stopping. All day long.
FAQ
No, you don’t have to. You can use latex paint, but you’d need to completely sand down all the surfaces to get a nice and smooth finish. However, if it has a shiny surface, that could prove to be quite difficult, if not impossible, without taking apart the piano and removing the keyboard and other parts. I highly recommend chalk paint for all of those reasons.
Without the shiplap, and just painting, it was about 6-7 hours of work, including the drying time. It has 3 coats plus a coat of wax. Chalk paint dries very quickly, so it really cuts down on the project time. Depending on the size of your piano and how many coats you do, this time will vary.
More painting projects

Thanks so much for stopping by! Join me on Instagram for even more ideas and inspiration…I’d love to see you there. 🖤

Originally posted 2015
Just beautiful! Love your ideas, Miss Kierste! :o0
Thank you, thank you!!! xoxo
I love it!
Thank you so much, Teri!!! xoxo
I have a spinet piano as well and we are living in temp housing while our house is getting built! Your situation sounds familiar. :) Love what you did with the piano!!!
Yes, that certainly does sound familiar!! :) I hope you are close with your house…
For those of you who don’t know Kierste, I wanted to let you know that she is an accomplished pianist among all of her many talents, so when she says it did not effect the sound of the piano, and the fact that she is happy with the results is something you can totally trust! It is beautiful Kierste – good job!
Ang, I love you! Thank you!! xoxo
Oh my goodness! You have just inspired me! (As always when I read your blog!) We inherited an old upright that even has ivory keys! It has become so scratched over the years and I hate to see such a gorgeous piano just fade away! I am going to try this! Thank you for sharing your amazing creativity and talent!
How did you paint the cover that goes over the keys that slides in and out?
Yay! You’ll have to send me the before and after pics, I would love to see them! For the part that slides in and out, I left it for last. I did all the coats with it slid back in, then I slid it out, and added three coats on that part. Same with the wax–I waxed with it in first, let that dry, then slid it back out and finished that part. I hope that made sense, lol.
Kierste! I must find me a piano now! You are incredible!
Thank you so much, Shannon! And yes, you need to find a piano! I’ve discovered that there are plenty of people out there wanting to get rid of their old pianos–either for free, or for a very reasonable price. Hope you find one you love!!
I LOVE this. Seriously. If I could convince my husband to let us do this I would already be buying paint! But since our piano was his parents . . . alas. I would be staring at that piano all day too. So perfect!
I totally understand. I was really nervous about telling my mom, but fortunately she loves it! I think if it wasn’t my parents, I Would feel the same way!!
Oh. my. gosh. It looks amazing! It looks awesome! LOVE it!
Thank you, my dear!! xoxo
This is amazing! Simply beautiful. We’re in temp housing too waiting to close on a house and I want to paint my crib (it’s a “lovely” honey oak :). Would you recommend chalk paint? And would you have it assembled or disassembled? I was thinking disassembled but after reading this I wondered about putting it on wood blocks…..just so many slats to paint.
Hi Kierste,
My grandparents are giving me their piano next year but are concerned about me painting it since they are concerned it will cause the acoustics to be different. Did you notice anything afterward?
thank you!
Hi Courtney,
I can totally understand their hesitation. There has been absolutely no difference in the sound or acoustics at all. Paint didn’t touch any of the internal parts of the piano at all, and I was really cautious when painting it. It’s been totally fine, and I wouldn’t hesitate to do it again! xoxo
Great work! I just got a second hand console piano and want to do something similar, but I was wondering if you had reckon whether putting planks or a big panel on the back of an upright would be doable with nails and glue like you did for the front? My piano has the typical open unfinished cross-hatching type stuff on the back, but I am hoping to make the back of the piano flat so that it can be painted on and visually displayed as part of the piano being in the middle of the room. (An alternate option is to buy a fabric piano backing rather than add wood). Thanks!
Hi, Julian! I wouldn’t add wood to the back or an upright—that’s where the sound comes out, and would greatly affect the sound and the piano. I would go for fabric!!