• Home
  • Blog
  • Project Gallery
  • About Me
    • About Old Salt Farm
    • Contact Info
  • Terms of Service & Privacy Policy
  • My Book
    • Email
    • Facebook
    • Instagram
    • Pinterest
    • Twitter

Old Salt Farm

Farmhouse + DIY

  • DIY
    • DIY Home Decor
    • Paint & Stain Projects
    • Re-purposed Projects
    • Woodworking
    • Outdoor Projects
  • For the Home
    • Old Salt Farm
    • Farmhouse Style
    • Home Decor & Styling
    • Cleaning
    • Organization
    • Entertaining
    • Crafts
      • Printables
      • Fonts
      • Silhouette
      • All Crafts
      • Kids’ Crafts
  • Holidays
    • 4th of July
    • Back to School
    • Christmas
    • Cinco de Mayo
    • Easter
    • Fall
    • Halloween
    • New Year’s Eve
    • Spring
    • St. Patrick’s Day
    • Summer
    • Thanksgiving
    • Valentine’s Day
    • Winter
  • Family Life
    • Kids’ Ideas
  • Gift Ideas
    • Birthdays
    • Father’s Day
    • Mother’s Day
    • Teachers
    • Thank you
    • Thinking of You
    • Weddings
    • Babies
  • Lifestyle
    • Travel
  • Recipes
    • Appetizers
    • Breads
    • Breakfast
    • Crockpot
    • Cookies & Bars
    • Desserts
    • Main Dishes
    • Soups
    • Snacks
    • Drinks
    • Holidays
    • Game Day
  • The Farmhouse Finder
  • Shop

Sep 13, 2013

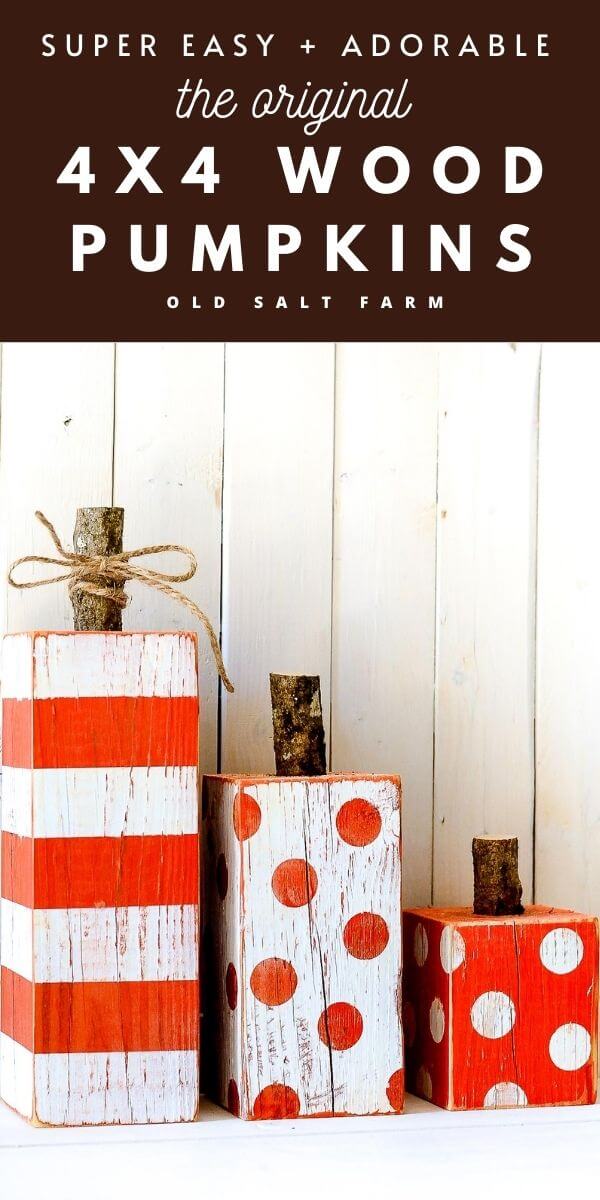
DIY Striped & Polka Dot 4×4 Wood Pumpkins

Just so you know, I’m totally obsessed with stripes.  And polka dots. I’m giddy over these Striped & Polka Dot  4×4 Wood Pumpkins, and they are fall decor perfection!

4x4 Wood Pumpkins | oldsaltfarm.com

 Could you not DIE????

STRIPED & POLKA DOT 4×4 WOOD PUMPKINS

You are going to love how easy they are to make…and I’m going to show you how! These would be really fun to make in a group (Super Saturday), as a gift, or for your own cute house!  I made these for less than $2, since I already had the paint.

Going in on it with someone will drastically reduce your costs, because you can share paint, and the 4×4 post. You can get a lot of the supplies at Michaels–craft paint, twine, hot glue, vinyl, and even circle stickers if you don’t have a Silhouette.  The rest of the stuff I got at Home Depot. Or, make these for others, and they become a really inexpensive and super adorable gift idea! 

4x4 Wood Pumpkins | oldsaltfarm.com

SUPPLIES:

(affiliate links are included for your convenience)

  • -4×4 post, cut into three lengths–10 inches, 7 inches, and 4 inches
  • –spray paint in orange and white OR craft paint
  • -1 inch (approx.) stick or branch
  • -painters tape
  • -round stickers/vinyl circles
  • -drill
  • -1 inch spade bit
  • –wood glue or hot glue
  • -jute 
  • -sander


DIRECTIONS:

1.  The first step is to paint your wood the base color–the color you want your polka dots to be.  For the stripes, your base color will be the one that you DON’T want the top to be.  Let it dry completely.

2.  Apply your round stickers to the ( I used my Silhouette to cut out 1 inch circles) pieces of wood that you want to be polka dotted.  I didn’t have a pattern that I followed–I just added them the way I liked them!  Apply your painters tape to the piece of wood you want to be striped.  I used Frog Tape, and applied it so that I skipped a space equal to the size of the tape, so that the striped would be even.

4x4 pumpkin | oldsaltfarm.com

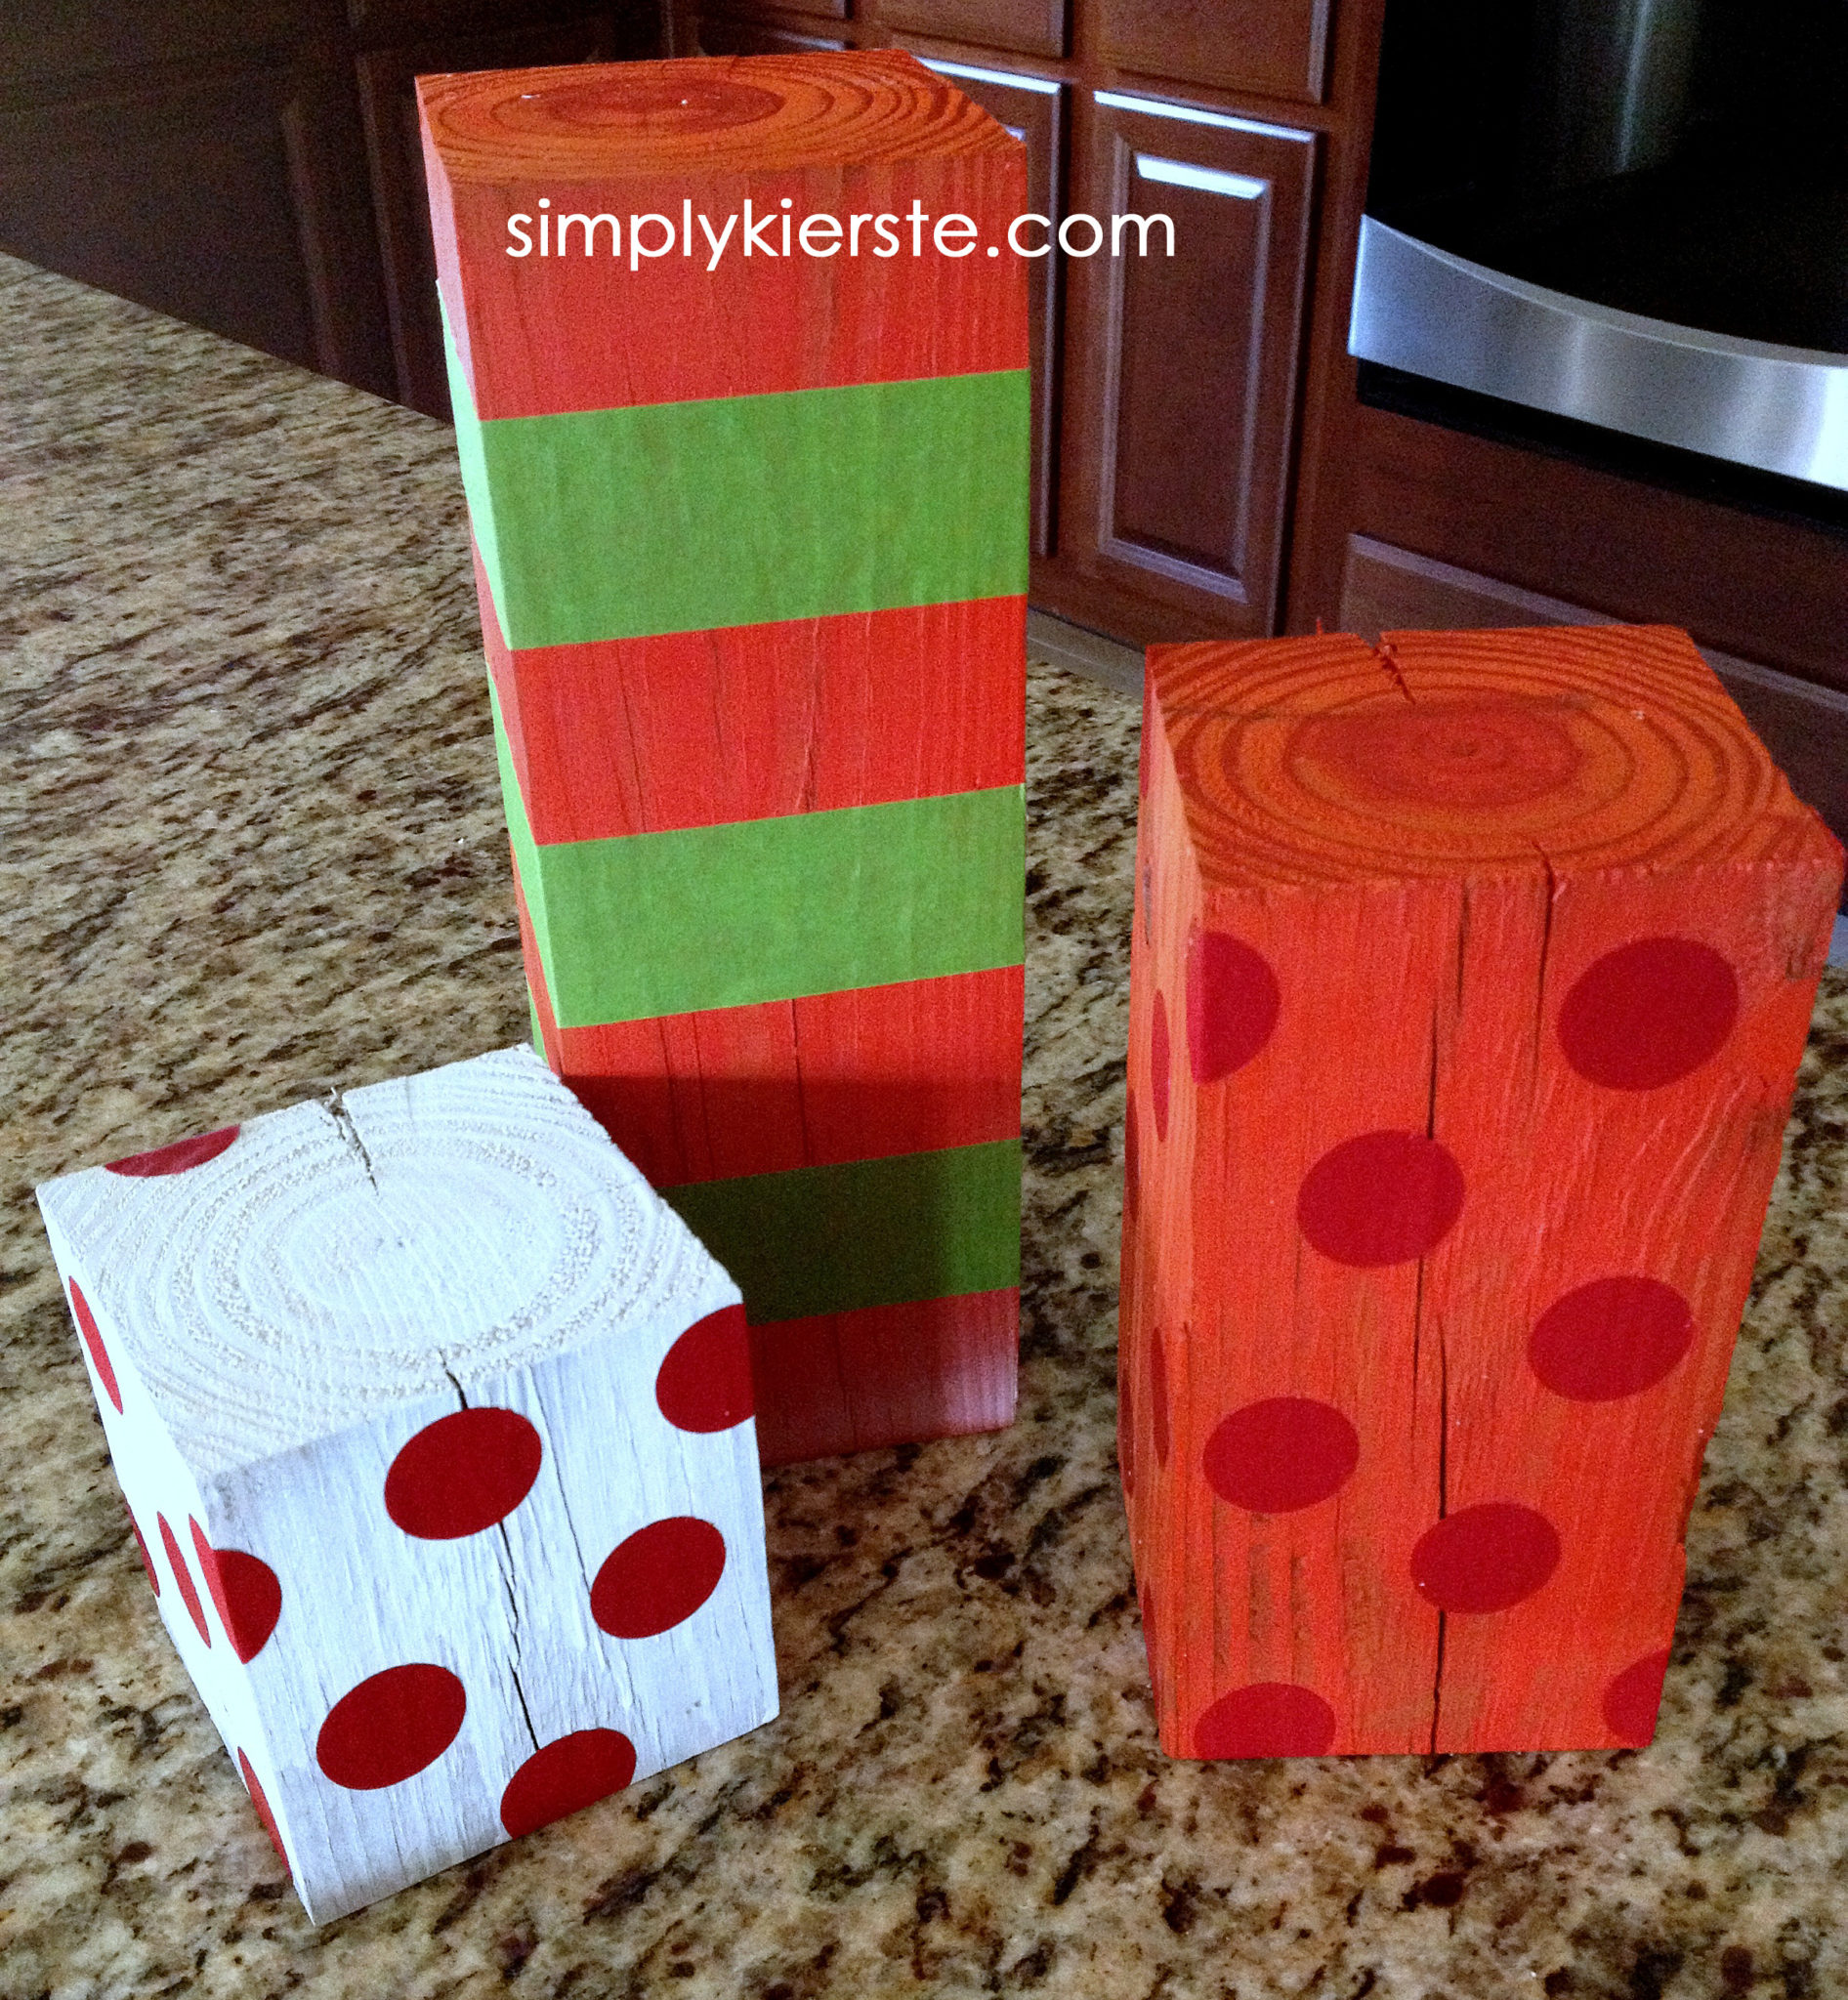
 3. Once the tape and stickers are on, you can paint the wood the top color–the other color!  For example, if you painted a piece of wood white first, then added the stickers, you would spray it orange.  The wood would end up being orange, with white polka dots.  Let dry completely.

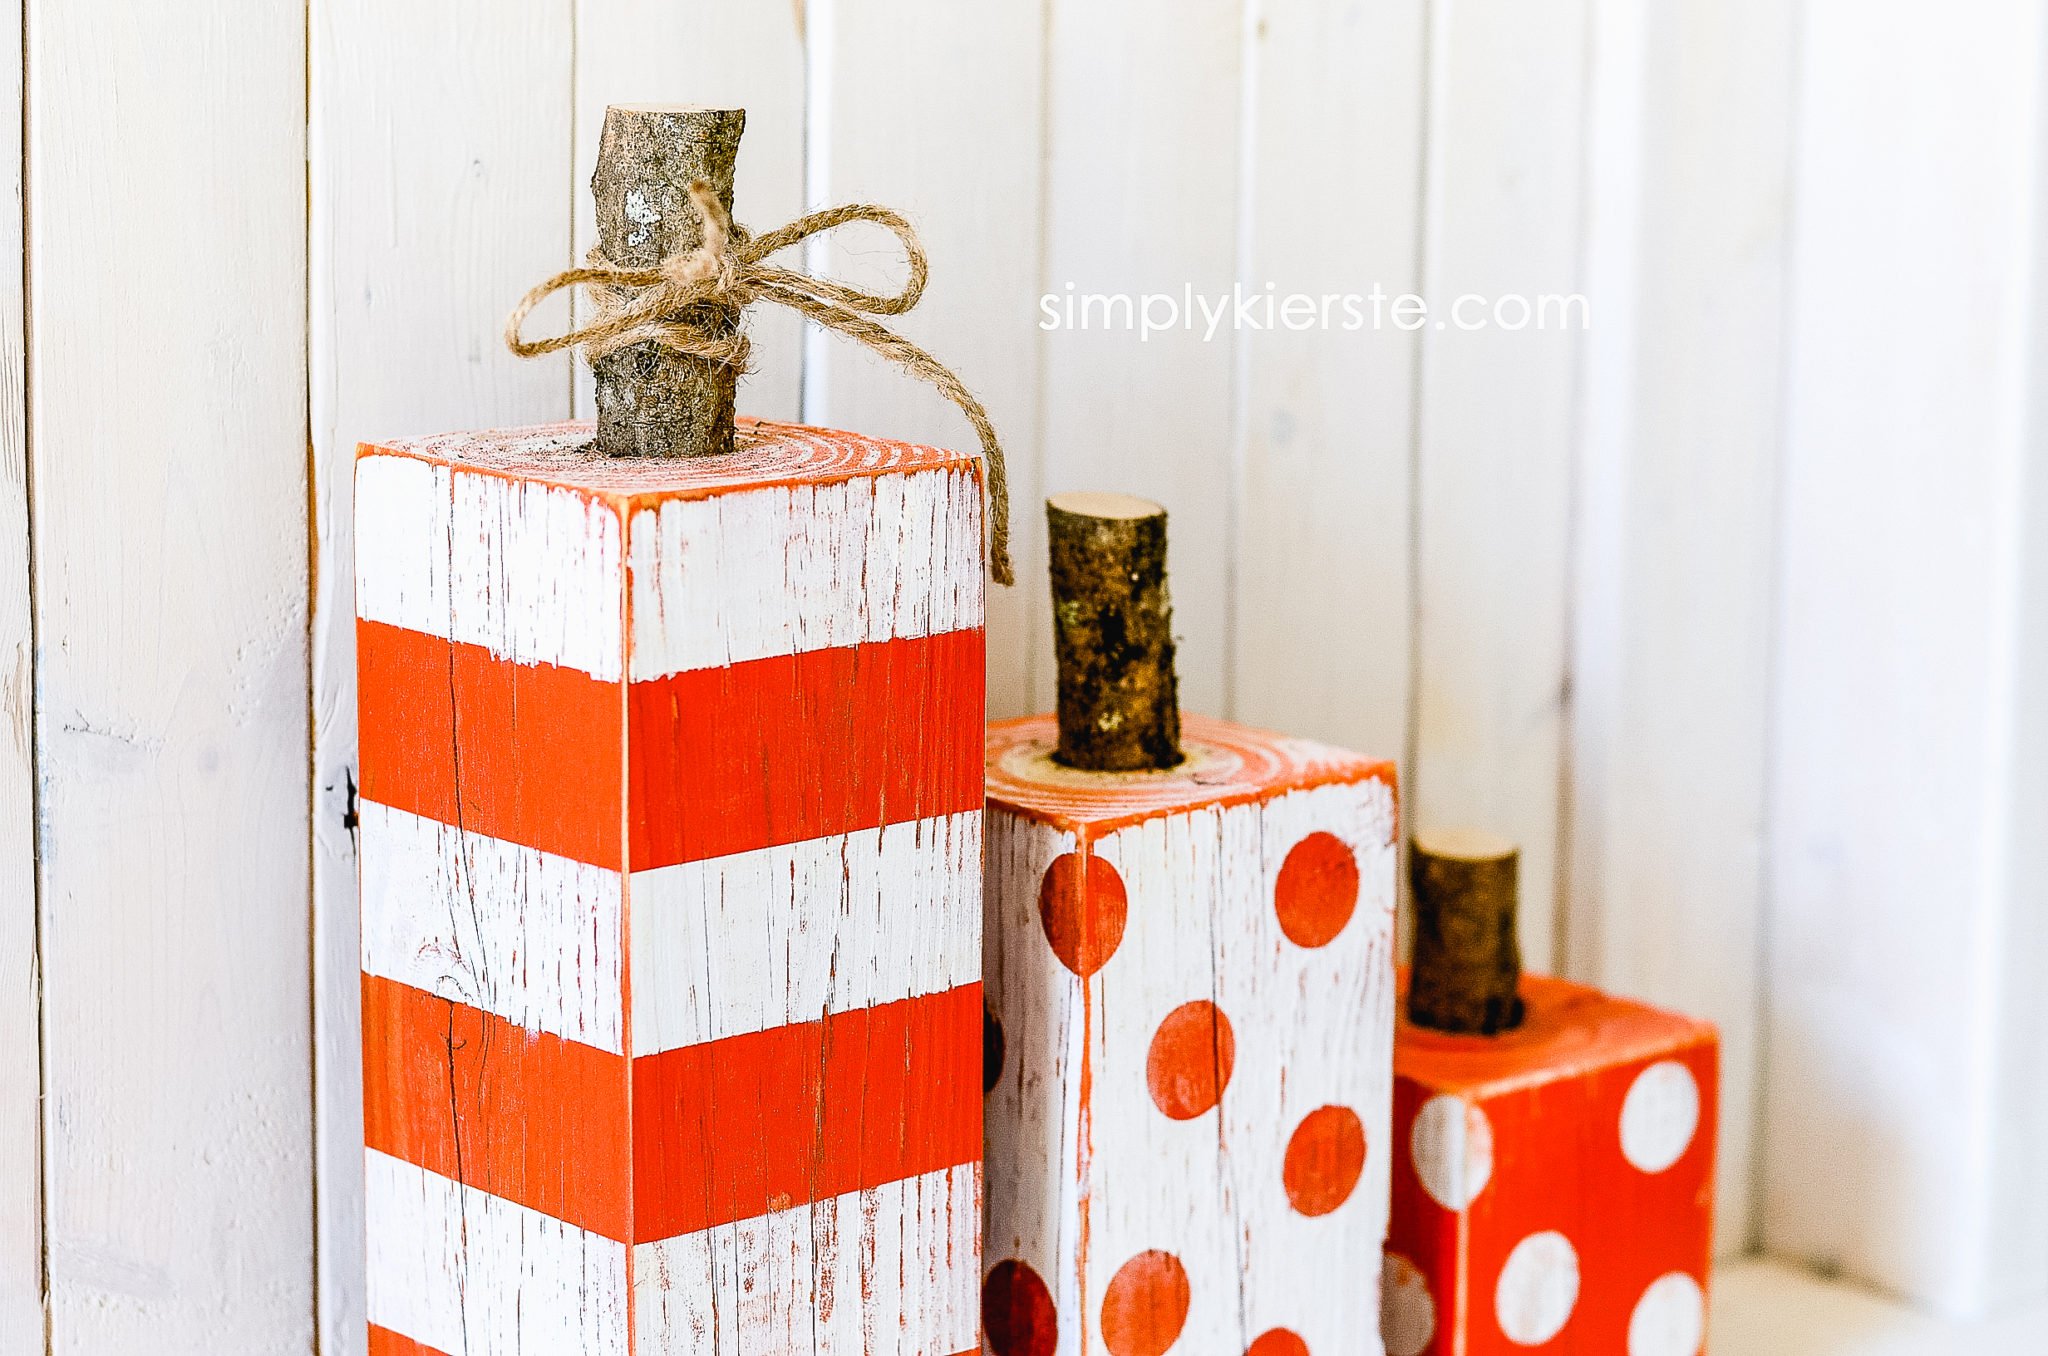
4.  Remove the stickers and tape.  Using a 1 inch spade bit, drill a hole in the top of each piece of wood.  Cut your branch/stick down to the height that you want, then use hot glue or wood glue to secure it inside your drilled hole.  If you use a branch that’s smaller or larger than 1 inch, you will have to use a different size spade bit.  Try to find a branch that’s close to the size of one of your bits, or there will be a noticeable gap.

4x4 pumpkin 4 copy

 5.  Sand the edges of your wood, and VERY lightly on the fronts.  The paint will come off easily, so use a fine grit sandpaper and go very lightly.  It’s so cute, because the color you painted first will come through, giving it a really great texture and dimension.  Wipe of all the excess dust, and tie twine to the largest pumpkin! Ta-da!!! Darling striped & polka dot pumpkins!!!

4x4 Wood Pumpkins | oldsaltfarm.com

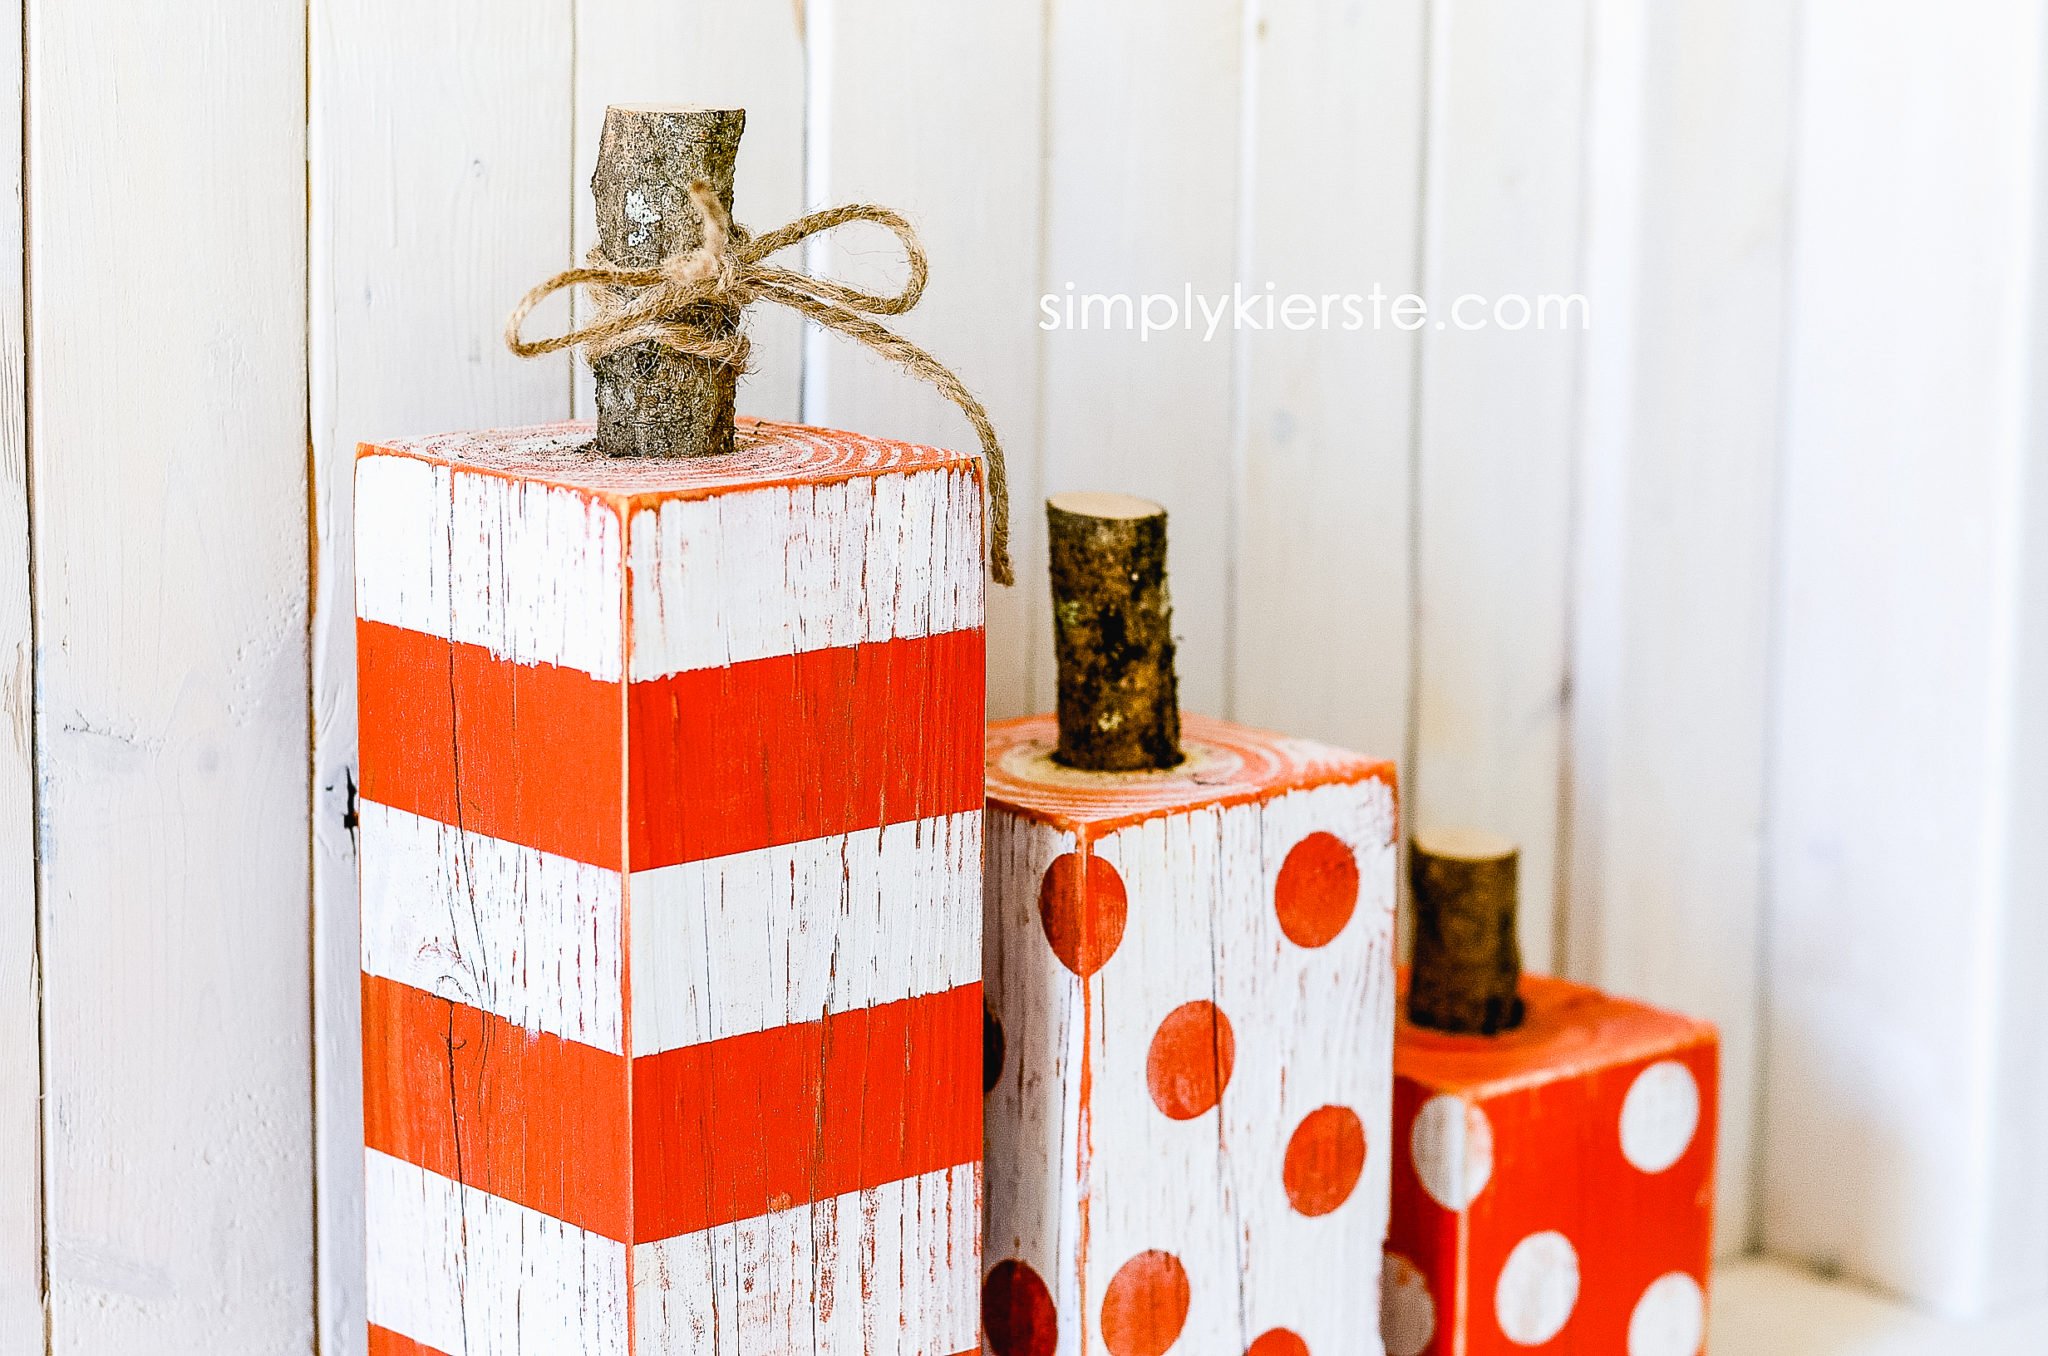
LOVE LOVE LOVE!!! These are the perfect fall decor, because they can stay out for fall, Halloween, and Thanksgiving!

Other Fall & Halloween projects you might like…

  • DIY STRIPED MASON JAR SOAP PUMP
  • MASON JAR GHOST LANTERN
  • PAINT CAN TRICK-OR-TREAT BUCKETS
4x4 Striped & Polka Dot Wood Pumpkins

Share and save for later!

  • Share
  • Email

Filed Under: All Crafts, Crafts, Fall, Halloween, Holidays, Silhouette, Thanksgiving | 98 Comments

« Previous post
Next post »

Lovely comments

  1. Sandi Allen says

    Sep 13, 2013 at 9:04 am

    Love these! So Sweet!
    Have a wonderful weekend!

    Reply
    • simply {kierste} says

      Sep 14, 2013 at 3:17 pm

      Thank you so much, Sandi! Thanks for stopping by!! xoxo

      Reply
  2. Eveline van Heijst says

    Sep 13, 2013 at 9:07 am

    I love these. They look great.
    Eveline.

    Reply
    • simply {kierste} says

      Sep 14, 2013 at 3:17 pm

      I’m so glad you like them!!! :)

      Reply
  3. Leigh Anne@Yourhomebasedmom.com says

    Sep 13, 2013 at 9:24 am

    Totally loving the amazing cuteness of these pumpkins!!! Making, pinning, loving!

    Reply
    • simply {kierste} says

      Sep 13, 2013 at 1:31 pm

      Thank you so much, Leigh!!! xoxo

      Reply
  4. Stephanie says

    Sep 13, 2013 at 9:34 am

    Love them! You have the best projects, especially for the ‘diy iimpaired’…that would be me :)

    Reply
  5. Stephanie says

    Sep 13, 2013 at 9:35 am

    And evidently the spelling impaired…

    Reply
    • simply {kierste} says

      Sep 13, 2013 at 1:31 pm

      Lol. Anyone can do these! If you make them, let me know!!! :)

      Reply
      • tonya says

        Oct 5, 2013 at 8:53 pm

        Just made them. Went to Lowe’s and the man told me I had to wait 30 days for the wood to dry! What? I don’t have 30 days….Halloween is right around the corner. We’ll see what happens. Worse case….$2.00 down the drain!!! lol They are adorable!!!! Making them for all my friends!

        Reply
        • simply {kierste} says

          Oct 6, 2013 at 9:23 pm

          It must be treated wood. I’ve used it many times before, and never let it dry for 30 days beforehand. It does depend on how “wet” it is–if it’s super wet, then you may want to set it out in the sun for a few days first. Good luck!!

          Reply
  6. patti says

    Sep 13, 2013 at 10:17 am

    OMG, these are so dang cute. I love them and want to make some..

    Reply
    • simply {kierste} says

      Sep 13, 2013 at 1:29 pm

      You totally should, Patti!! I think they’re even cuter in person!! xoxo

      Reply
  7. Kathy J says

    Sep 13, 2013 at 11:18 am

    I am in LOVE with these! I will make these this fall. Thank you!!!

    Reply
    • simply {kierste} says

      Sep 13, 2013 at 1:28 pm

      So glad you love them, Kathy!!! Thanks for popping by!!! xoxo

      Reply
  8. Pam - Housewives of Frederick County says

    Sep 13, 2013 at 11:20 am

    This is OH so cute!! Thankfully I have a husband who can do the cutting and drilling. I might just have to try this.

    Reply
    • simply {kierste} says

      Sep 13, 2013 at 1:28 pm

      You totally should…you will love them! :) Let me know how it goes! xoxo

      Reply
  9. Diane {Created by Diane} says

    Sep 13, 2013 at 11:29 am

    These are SOOOO cute!

    Reply
    • simply {kierste} says

      Sep 13, 2013 at 1:28 pm

      Thank you so much!!! xoxo

      Reply
  10. katie says

    Sep 13, 2013 at 11:55 am

    These are so cute! I’ve found my next “Craft Night” project!

    Reply
    • simply {kierste} says

      Sep 14, 2013 at 3:18 pm

      Have so much fun! I’d love to see a picture of all of your craft night pumpkins!! :)

      Reply
  11. Alaina says

    Sep 13, 2013 at 12:27 pm

    these are so stinkin cute!!!!! LOVE! Thanks, Kierste!

    Reply
    • simply {kierste} says

      Sep 13, 2013 at 1:27 pm

      You are so welcome, Alaina!!! Thanks for stopping by!!! xoxo

      Reply
      • simply {kierste} says

        Sep 13, 2013 at 1:27 pm

        These would be so perfect for a craft night–you guys have so much fun!!! xoxo

        Reply
  12. The Bearfoot Baker says

    Sep 13, 2013 at 1:58 pm

    Oh my goodness! They are so so cute!! I want to make them right now:) Thanks for sharing!!

    Reply
    • simply {kierste} says

      Sep 13, 2013 at 4:26 pm

      You should! Lol. Thanks so much for coming by!!! :)

      Reply
  13. Natalie says

    Sep 13, 2013 at 6:58 pm

    Do you prime you wood before the spray paintI can’t get my spray paint to layer well.

    Reply
    • simply {kierste} says

      Sep 14, 2013 at 8:39 am

      I don’t prime my wood on things like this. Make sure that the first coat is totally and completely dry. Also, use a really good spray paint. I prefer Rustoleum, and they actually have a paint and primer in one, that you could try. You just need a light coat for the bast coat–one that covers, but not really thick. Good luck!!!

      Reply
      • Natalie says

        Sep 14, 2013 at 11:30 am

        Thanks–just tried a nicer spray paint and it worked much better than my cheap stuff I use. Thanks for the tip!

        Reply
        • simply {kierste} says

          Sep 14, 2013 at 2:31 pm

          Oh good! So glad it worked!! xoxo

          Reply
  14. Carson says

    Sep 14, 2013 at 8:21 am

    I think these will make a great front porch decoration. Should I put a sealant on to protect the paint? Thanks for sharing!

    Reply
    • simply {kierste} says

      Sep 14, 2013 at 8:40 am

      Yes, you could apply a clear sealant if it’s going to be outside and not under a porch. I would use a matte finish, instead of a glossy one! And you are so welcome!!! xoxo

      Reply
  15. Mariel @ Or so she says... says

    Sep 18, 2013 at 7:43 pm

    These are adorable, Kierste!

    Reply
    • simply {kierste} says

      Sep 19, 2013 at 11:23 am

      Thank you, Mariel!!! xo

      Reply
  16. Handmade by Lauire says

    Sep 19, 2013 at 8:30 am

    Thanks so much for the great idea! I made this already, turned out so cute. Going to post on m,y website tonight with a your website for the idea and directions. I also love stripes and polka dots

    Reply
  17. Tammy says

    Sep 19, 2013 at 9:33 pm

    In the picture, the tallest pumpkin looks like it is taller than 10″ especially if the stripes are 2″. Can you please verify heights again?

    Reply
    • simply {kierste} says

      Sep 20, 2013 at 7:15 am

      The tallest one is 10 inches. I said the tape wasn’t quite 2 inches, but I didn’t put the specific measurement. I think I need to go change that! The tape was probably closer to 1.5 inches.

      Reply
  18. Desiree @ The 36th Avenue says

    Sep 22, 2013 at 10:33 pm

    These are the cutest… I am pinning :)

    Reply
    • simply {kierste} says

      Sep 23, 2013 at 11:33 am

      Desiree, thank you!!!! So glad you stopped by!! xoxo

      Reply
  19. Becky says

    Sep 22, 2013 at 11:20 pm

    So cute! I am sharing these on my facebook page! https://www.facebook.com/BeyondThePicketFenceEtsyShopAndBlog

    Reply
    • simply {kierste} says

      Sep 23, 2013 at 11:33 am

      Thank you so much, Becky!!! :)

      Reply
  20. Amber says

    Sep 23, 2013 at 9:21 am

    I was hoping you could tell me what kind of wood did you use?

    Thanks in advance!

    Reply
    • simply {kierste} says

      Sep 23, 2013 at 11:32 am

      I used old 4×4 posts we had, but you can use a new 4×4 post that can be bought at any home improvement store. I prefer untreated posts, if you can find them, but if you can’t, the treated ones will work too.

      Reply
  21. Darcie Gordon says

    Sep 25, 2013 at 3:56 pm

    I am having a horrible time finding any orange paint that isn’t a gloss… I’m assuming you didn’t use a gloss?

    Reply
    • simply {kierste} says

      Sep 26, 2013 at 3:14 pm

      Mine was a gloss (had the same problem, but didn’t want to use craft paint), but I distressed it with my sander, which eliminated the glossy look. Even a light sand will help!!!

      Reply
  22. Cookie 17 says

    Sep 25, 2013 at 6:50 pm

    My Daughter made these other day,they came out perfect,everyone commented her on facebook how pretty they were she got them off pinterest Thank’s for ideas,,,

    Reply
    • simply {kierste} says

      Sep 26, 2013 at 3:52 pm

      I’m so glad!!! Thanks so much for letting me know! :) I love to hear about it!

      Reply
  23. Cheryl says

    Sep 28, 2013 at 7:42 pm

    I have 4 sets in the works right now! Thanks for the inspiration…

    Reply
    • simply {kierste} says

      Sep 30, 2013 at 11:24 am

      Four sets???!!! Fun!!

      Reply
  24. Dagmar says

    Sep 30, 2013 at 1:53 pm

    I like your pumpkins so much! I think that I will try to make some too!
    Until now I only did some of fabric.

    Reply
  25. Ami says

    Oct 3, 2013 at 2:10 pm

    What finish of paint did you use? Gloss, satin, etc?

    Reply
    • simply {kierste} says

      Oct 3, 2013 at 2:41 pm

      I used Rustoleum spray paint, in orange. It was gloss, which is the only thing I could find in that color. I always sand the paint to distress it, which removes any gloss that might be there.

      Reply
  26. Dria says

    Oct 10, 2013 at 2:14 pm

    These are so adorable! Sharing and pinning them :)

    Reply
    • simply {kierste} says

      Oct 10, 2013 at 2:30 pm

      Thank you so much, Dria!!! xoxo

      Reply
  27. Lindy says

    Oct 10, 2013 at 2:32 pm

    These pumpkins are ABSOLUTELY gorgeous! I love them!

    Reply
    • simply {kierste} says

      Oct 10, 2013 at 2:34 pm

      Oh my goodness, Lindy, thank you so much!!! Glad you stopped by!!!

      Reply
  28. Courtney says

    Oct 11, 2013 at 7:59 am

    I just love your site and have been following you for awhile now. These stripped and polka dot pumpkins are great. I had to feature them on my Facebook page this morning. Your crafts and pictures really inspire me!!

    Reply
  29. Courtney says

    Oct 11, 2013 at 8:04 am

    I can’t find where you added this craft on your Facebook page.

    Reply
    • simply {kierste} says

      Oct 11, 2013 at 3:15 pm

      I couldn’t find it either, which is SO weird! I know I posted it, lol! I went ahead and added it again–it’s there now!! Thanks so much!!! xoxo

      Reply
      • Courtney says

        Oct 11, 2013 at 5:36 pm

        no problem!

        Reply
  30. Barbara says

    Aug 31, 2014 at 9:27 am

    These pumpkins are adorable and so simple to make. I am hosting a craft day at my house for family and friends to make these. Thank you for sharing your talents with all of us. I look forward to more ideas on your blog.

    Reply
    • Simply Kierste says

      Aug 31, 2014 at 2:37 pm

      What a fun craft day!! I’m so glad you found me. :) Thanks so much of reading!!! xoxo

      Reply
  31. Kathy says

    Aug 31, 2014 at 4:22 pm

    Kierste, I love all your craft ideas. I went yesterday to buy my supplies for the beautiful fall berry garland wreath. I started it today but ran out of twine before I could finish (my fault. . Didn’t buy enough):-( but I am so excited to finish it! Next weekend my husband said he would cut my wood for the precious striped and polka dot pumpkins. I want to thank you for sparking my interest in making crafts again and putting the warmth back in my home that can only be achieved through these beautiful handmade items. Bless your heart:-)

    Reply
    • Simply Kierste says

      Aug 31, 2014 at 11:01 pm

      Yay!! That makes me SO happy!! Sorry you didn’t have enough twine–I’ve totally done that before! Thank you so much for reading, and for commenting. Have fun creating!!! xo

      Reply
  32. megan says

    Sep 2, 2014 at 12:59 pm

    How darling! What finish did you use on the spray paint or does it matter?

    Reply
    • Simply Kierste says

      Sep 2, 2014 at 2:15 pm

      I didn’t use a finish on this project, because I don’t think it matters. I think you’re good leaving it as is, but a finish wouldn’t hurt it. If you do use one, I would suggest a matte finish! Thanks so much for stopping by!!! xoxo

      Reply
      • Megan says

        Sep 2, 2014 at 2:49 pm

        Sorry! I should have been more clear. What finish was the spray paint? Was it gloss or satin or flat or does it matter? Thanks!

        Reply
  33. cindy says

    Sep 7, 2014 at 9:42 pm

    Adorable! Any suggestions other than vinyl circles. I bought round xmas stickers and it didn’t work! I repainted over but need another suggestion. Thank you!

    Reply
    • Simply Kierste says

      Sep 7, 2014 at 11:30 pm

      What went wrong? Did they not stick? You could buy a sheet of vinyl at Hobby Lobby, Michaels, or Joann Fabric, then use a 1 inch circle punch to cut circles out. I’ve bought single sheet of vinyl before, or if you’re going to do it with friends, you could buy a roll–doesn’t matter which brand, just buy with they have! Good luck, and let me know if you have any other questions!

      Reply
      • cindy says

        Sep 10, 2014 at 1:00 pm

        Thanks – it worked! I love them!

        Reply
        • Simply Kierste says

          Sep 10, 2014 at 1:17 pm

          YAY! I’m so glad!!!

          Reply
  34. julie says

    Sep 11, 2014 at 8:36 pm

    Is vinyl sheets sticky? Just wondering how they stick to the wood?

    Reply
    • Simply Kierste says

      Sep 12, 2014 at 2:54 pm

      Yes, vinyl sheets are sticky. Once you punch the holes out, peel off the back, and stick them onto the wood!

      Reply
  35. Sherry says

    Sep 12, 2014 at 10:51 pm

    Oh I am giddy. I love them! I’ve made the firecrackers. But these are great! Thanks for including the ‘how to’ I’d love you to link to my Fabulous Fall linky party!!

    http://myjourneyback-thejourneyback.blogspot.com/2014/09/fabulous-fall-linky-party.html

    Reply
    • Simply Kierste says

      Sep 14, 2014 at 7:05 am

      Thank you so much, Sherry! xo

      Reply
  36. Claudene Holloway says

    Sep 13, 2014 at 10:53 am

    Using this same concept…any ideas for Christmas?

    Reply
    • Simply Kierste says

      Sep 14, 2014 at 7:04 am

      Yes! These are my peppermint striped candlesticks, and I love them! https://oldsaltfarm.com/2013/12/peppermint-striped-candlesticks.html

      Reply
  37. megan says

    Sep 13, 2014 at 2:15 pm

    What kind of spray paint did you use? Was it gloss, satin, or flat.

    Reply
  38. Alicia says

    Sep 13, 2014 at 11:36 pm

    I’m doing a craft night coming up and making these (Super adorable by the way). Do you think craft paint would work ok? My party is at night and not a lot of room at my house to spray paint:)

    Reply
    • Simply Kierste says

      Sep 14, 2014 at 7:09 am

      Yes, you could use craft paint, but it will take a lot—it’s absorbed into the wood easily. It also takes a little longer to dry. If you plan for these possibilities, you should be fine!

      You can also spray paint outside–lay a tarp out on your driveway or porch, and turn on the outdoor lights–if you have space.

      Have fun! They are perfect for craft night! xo

      Reply
  39. Kathy says

    Sep 21, 2014 at 8:47 pm

    Kierste, I just wanted to tell you that my 82 year old mom and I took the day together and made a set of these precious pumpkins for both of us! She used the cream color instead of the white but I made mine just like yours. We had so much fun doing these. For the dots, we used the circle yard sale stickers you use to put prices on items and they worked well. Thank you so much for sharing your wonderful ideas with all of us:-) Tomorrow I plan to make your recipe for cinnamon swirl cake! Xoxo

    Reply
    • Simply Kierste says

      Sep 23, 2014 at 2:31 pm

      I LOVE that you made it together!! That’s one of the best parts about making things—making it with someone you love!! You’ll have to let me know what you think about the cake. :) xoxo

      Reply
  40. Michele says

    Oct 15, 2014 at 12:15 am

    I <3 your sweet stripes and dots!!! Pinned

    Reply
    • Simply Kierste says

      Oct 15, 2014 at 8:27 am

      Thanks so much for stopping by and pinning!!! xo

      Reply
  41. Deborah says

    Oct 21, 2014 at 11:02 am

    Aaaaaaadorable! This is great.

    Reply
    • Simply Kierste says

      Oct 21, 2014 at 11:10 am

      Thank you so much, Deborah!!! So glad you stopped by!

      Reply
  42. Brenda says

    Nov 2, 2014 at 4:45 pm

    These are absolutely adorable. I am working on a set of these right now. Would acrylic craft paint work ok, ya think? Spray painting is such a mess. Any tips you can give me? Thank you!

    Reply
    • Simply Kierste says

      Nov 3, 2014 at 11:03 am

      Thank you so much! Yes, you can use craft paint. I don’t typically use it because it takes a lot more paint, and several coats, meaning more time. The wood soaks up the paint faster. But, it will totally work, and if you prefer it, you can definitely use it!

      When I spray paint, I lay out a tarp for protection. I have squares of plywood with nails poking out of it for my wood to sit on so it’s off of the ground, and I do a quick spray. If you’re in a confined space, or don’t have room to use spray paint, or don’t like the mess, then craft paint is a good option! Just buy more paint than you think you’re going to need, and you can always return it unopened if you don’t need it.

      Good luck! Let me know if you have any other questions!

      Reply
  43. April Driggers says

    Nov 6, 2014 at 7:22 pm

    Added this to my Pinterest board for fall crafts I wanna do and included you on my blog for the November Blogathon for links to awesome fall crafts! LOVE! LOVE! LOVE!!!!!

    Reply
    • Simply Kierste says

      Nov 6, 2014 at 9:30 pm

      Yay, thank you so much, April! So glad you love it!

      Reply
  44. Nanna says

    Nov 24, 2014 at 8:57 am

    I am making this project and now that I’ve read through the mile of posts see that there were things you added or adjusted to the directions…would be helpful if you change he directions so that’s what we would have to go by.
    Thanks for posting, it is adorable.

    Reply
    • Simply Kierste says

      Nov 25, 2014 at 4:01 pm

      Hi Nanna,

      I’ll have to read through all the comments and make adjustments, thanks! I know there’s something in there about the width of the tape, but I couldn’t remember anything else. Thanks for reading!!! xoxo

      Reply
  45. becky strahan says

    Sep 13, 2015 at 3:13 pm

    Too cute! How many blocks of wood do you think one can would cover?

    Reply
    • Simply Kierste says

      Nov 18, 2015 at 5:06 pm

      I am SO sorry, Becky! I don’t know how I missed this comment! I’m sure it’s way too late, but it really depends on heavy you are on the paint. I can usually get 3 sets at least out of a white can and orange can–maybe even 4 or 5.

      Reply
  46. Lacey says

    Aug 22, 2018 at 12:00 pm

    Love these adorable pumpkins! Thanks for your cute post! We are thinking of doing these for a Super Saturday activity and we were wondering how long from start to finish they took to complete? Thanks again!

    Reply
    • Simply Kierste Design Co. says

      Aug 25, 2018 at 8:45 pm

      Hi, Lacey! I’ve done these for several Super Saturdays, and they’re definitely doable within 3-4 hours. It’s really just waiting for the paint to dry–everything else is quick and easy. If the weather is nice, I’ve actually done spray paint instead of craft paint–because it dries so much faster, but craft paint can work too. I always suggest ladies making these come at the very beginning to get them painted–but if you were stretched for time, you could even pre-paint them white ahead of time (and if you had time to do it), so they only had to add the orange stripes. If you have any other questions, please let me know! You can also email me at simplykierste@yahoo.com–I respond there more quickly. xoxo

      Reply
  47. Elon says

    Nov 15, 2018 at 10:22 pm

    All these for less than $2?? :O How could I have seen this only when Halloween is just over.. Shall give it a try for this Christmas :D

    Reply
    • Simply Kierste Design Co. says

      Nov 16, 2018 at 9:00 am

      Yes!! Try it for Christmas–they’re so fun!! xo

      Reply

Leave a Reply Cancel reply

Your email address will not be published. Required fields are marked *

Recipe Rating


This site uses Akismet to reduce spam. Learn how your comment data is processed.

search

COPYRIGHT POLICY

The images, tutorials, and content on oldsaltfarm.com are protected by copyright laws. DO NOT distribute or copy the content without written permission. You may not use any images without permission. DO NOT edit or remove watermarks from any image. Pictures are not to be changed or altered in any way, shape or form without my consent. Please do not copy text or reprint recipes without my permission. All ideas and printables are for your personal use only. By downloading any files or printables, you accept that they are FOR PERSONAL USE ONLY. My patterns, ideas and tutorials are NOT intended for resale or re-distribution.

Interested in sharing one of my photos or projects? Fill out my Old Salt Farm Feature Agreement.

Please contact me with any questions. oldsaltfarm@gmail.com

© Old Salt Farm (Kierste Wade)

CREATE AT YOUR OWN RISK

Any and all content on this website is created for inspiration purposes only. Creating with my suggested methods, products, instructions, tutorials, and tools is at your own risk. Please ensure you are following proper guidelines with anything used, and seek professional advice if you don’t know how to do something.

Old Salt Farm is for entertainment purposes only. All tutorials and demonstrations are not intended to be professional advice, nor substitute as such, and I make no guarantees as to the procedures and information here.

Read my full disclosure here.

AMAZON DISCLOSURE

Kierste Wade (Old Salt Farm) is a participant in the Amazon Services LLC Associates Program, an affiliate advertising program designed to provide a means for sites to earn advertising fees by advertising and linking to amazon.com. Amazon offers a small commission on products sold through their affiliate links. When you make a purchase after clicking on one of those links, I earn a small commission that helps support this blog, at no extra cost to you. Read my full disclosure here.
Copyright © 2021 Old Salt Farm, Custom site by Moonsteam Design.

Cookies

This website requires the use cookies. By using this site, you are agreeing to our Privacy Policy.