• Home
  • Blog
  • Project Gallery
  • About Me
    • About Old Salt Farm
    • Contact Info
  • Terms of Service & Privacy Policy
  • My Book
    • Email
    • Facebook
    • Instagram
    • Pinterest
    • Twitter

Old Salt Farm

Farmhouse + DIY

  • DIY
    • DIY Home Decor
    • Paint & Stain Projects
    • Re-purposed Projects
    • Woodworking
    • Outdoor Projects
  • For the Home
    • Old Salt Farm
    • Farmhouse Style
    • Home Decor & Styling
    • Cleaning
    • Organization
    • Entertaining
    • Crafts
      • Printables
      • Fonts
      • Silhouette
      • All Crafts
      • Kids’ Crafts
  • Holidays
    • 4th of July
    • Back to School
    • Christmas
    • Cinco de Mayo
    • Easter
    • Fall
    • Halloween
    • New Year’s Eve
    • Spring
    • St. Patrick’s Day
    • Summer
    • Thanksgiving
    • Valentine’s Day
    • Winter
  • Family Life
    • Kids’ Ideas
  • Gift Ideas
    • Birthdays
    • Father’s Day
    • Mother’s Day
    • Teachers
    • Thank you
    • Thinking of You
    • Weddings
    • Babies
  • Lifestyle
    • Travel
    • Style
  • Recipes
    • Appetizers
    • Breads
    • Breakfast
    • Crockpot
    • Cookies & Bars
    • Desserts
    • Main Dishes
    • Soups
    • Snacks
    • Drinks
    • Holidays
    • Game Day
  • The Farmhouse Finder
  • Shop

Oct 18, 2012

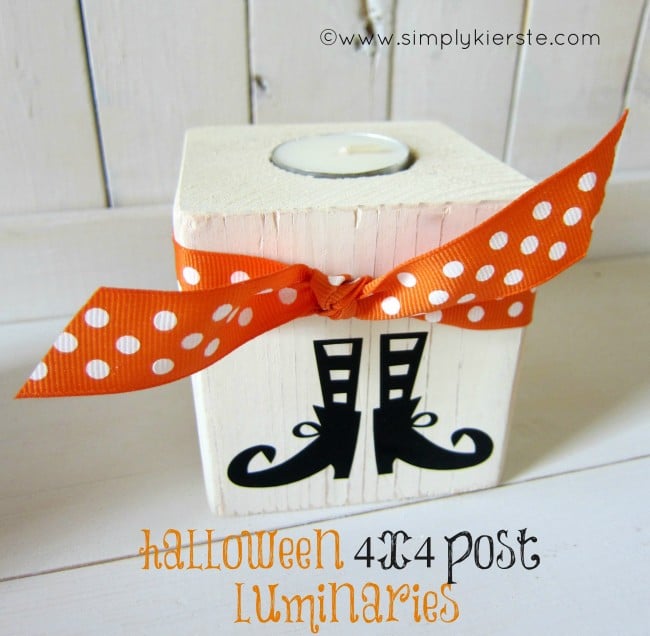
4×4 Post HalloweenLuminaries

Who is excited for Halloween?  ME!!!

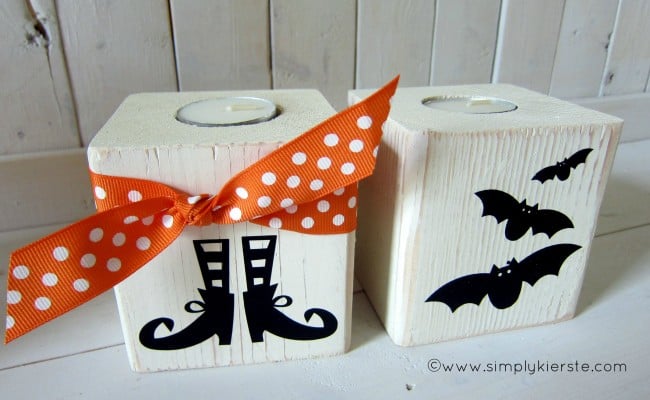
I wanted to make some Halloween luminaries for our front walk, and I wanted them to last for more than one night. So…with a 4×4 post and a little paint, I came up with something that I absolutely love!  You will not believe how easy and inexpensive these are, so you can make as many or as few as you like. This would make a great Super Saturday project!

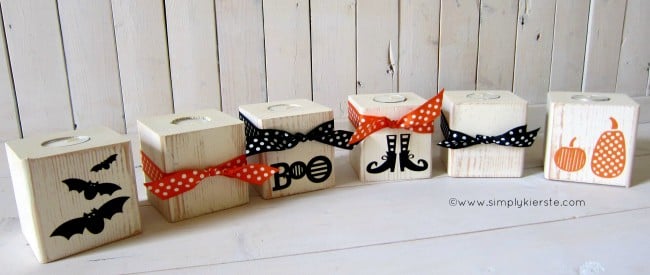
In addition to lining a front walk or porch, they would be darling in a window, or lining a tablescape.  I used them for a church Christmas party one year, and put them down the center of long tables, along with other decorations.  They don’t have to be for Halloween. Think Christmas—how about in each window?  Lining a table with greenery and berries? Or a Thanksgiving table?  The sky’s the limit!

You can use tea lights, but I highly suggest you use battery operated tea lights, especially if you’re using them indoors, if they’ll have no supervision, if there are children around, or if you tie ribbon around them.  So, pretty much every time.  :)  I used tea lights in my examples because that’s all I had on hand when I was taking pictures, but I will definitely be using the battery operated lights when I display them.

{supplies}

-4×4 post, cut into perfect squares

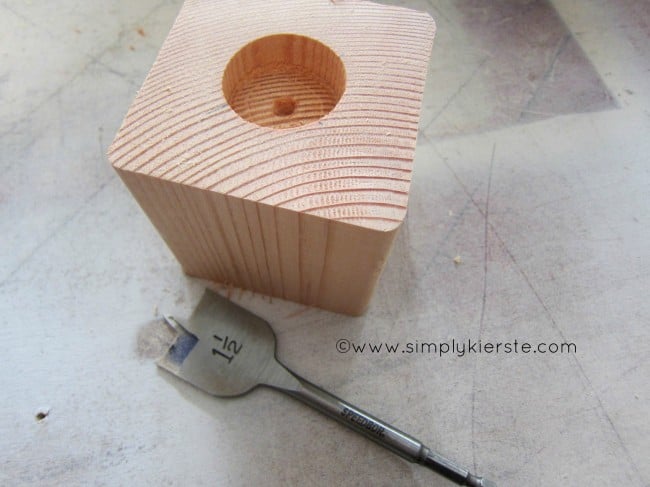
-1 1/2 inch spade bit, and power drill

-spray paint

-power sander, or lots of sandpaper!

-ribbon and other desired embellishments

{directions}

1.  Cut your 4 x 4 post into perfect squares.  Remember, the post will not be a 4 inches in width–it will be more like 3.5 inches, or close.  Measure the width first, before you cut it into pieces, to make sure that it will be a perfect square.

2.  Use your 1 1/2 inch spade bit to drill a hole into the top of each block.  This spade bit was around $6 at Home Depot, so very reasonable. They do have some more expensive versions, but this will work just fine!

3.  Spray paint your blocks and let dry completely.  I like mine distressed, so I took a power sander to them and let some of the wood show through.  You can always add a little stain or glaze if you want to–I didn’t have any on hand, so I didn’t.  The movers couldn’t pack any of my paint and stain when we moved, and I’m so used to having it our shop, that I forgot I didn’t have any.  I like it without, too!

4.  Add any embellishments you like!  I used my Silhouette to cut out different Halloween designs, and added my favorite polka dot ribbon in orange and black.

{kierste}

Share and save for later!

  • Share
  • Email

Filed Under: All Crafts, Crafts, Halloween, Holidays, Re-purposed Projects, Silhouette | 11 Comments

« Previous post
Next post »

Lovely comments

  1. katie says

    Oct 18, 2012 at 4:11 pm

    So very cute! Time to cut some wood, charge my drill and get out my drill bits! Thanks for the tutorial :)

    Reply
  2. lindsey says

    Oct 18, 2012 at 6:20 pm

    These are cute! Just curious what type of post you… is it just a standard 4″x4″ pressure treated post?

    Reply
    • simply {kierste} says

      Oct 18, 2012 at 6:47 pm

      It’s actually an untreated post. Our Home Depot sells them, but it can vary from store to store. Sometimes Lowes carries them as well. If I can’t find them, then I do use a treated post.

      Reply
  3. Katie says

    Oct 18, 2012 at 7:15 pm

    I LOVE these! So darling. I plan on making some for Christmas time!

    Reply
  4. Amy rohl says

    Oct 19, 2012 at 2:32 pm

    Too spooky cute!!

    Reply
  5. Eveline van Heijst says

    Oct 19, 2012 at 3:19 pm

    Love it. I like the Silhouette designs you used. I already have most of them in my library.
    Eveline.

    Reply
  6. kellie says

    Oct 19, 2012 at 3:46 pm

    OMGOSH… these are too cute! Thank you so much for sharing this project! I LOVE IT!

    Reply
  7. Carol says

    Oct 19, 2012 at 6:38 pm

    Those are So fun! Some lucky trick or treaters will have their path lit to your house.

    Reply
  8. Wendy says

    Oct 19, 2012 at 11:57 pm

    These are super cute! I wonder if mine would turn out as cute! Great inspiration!

    Reply
  9. Jillian says

    Nov 28, 2012 at 1:09 pm

    Any tips on using a 1 1/2 inch drill bit. I don’t know if my drill just isn’t powerful enough or if it’s user error, but I’m having a hard time drilling the holes. I was barely able to get through one – no blood, or tears, thankfully, but a lot of smoke!!

    Reply
    • simply {kierste} says

      Nov 28, 2012 at 2:49 pm

      You probably need a new drill bit. :) I got a new one at Home Depot right before this project for about $6, and it worked great.

      Reply

Leave a Reply Cancel reply

Your email address will not be published. Required fields are marked *

Recipe Rating


This site uses Akismet to reduce spam. Learn how your comment data is processed.


search

COPYRIGHT POLICY

The images, tutorials, and content on oldsaltfarm.com are protected by copyright laws. DO NOT distribute or copy the content without written permission. You may not use any images without permission. DO NOT edit or remove watermarks from any image. Pictures are not to be changed or altered in any way, shape or form without my consent. Please do not copy text or reprint recipes without my permission. All ideas and printables are for your personal use only. By downloading any files or printables, you accept that they are FOR PERSONAL USE ONLY. My patterns, ideas and tutorials are NOT intended for resale or re-distribution.

Interested in sharing one of my photos or projects? Fill out my Old Salt Farm Feature Agreement.

Please contact me with any questions. oldsaltfarm@gmail.com

© Old Salt Farm (Kierste Wade)

CREATE AT YOUR OWN RISK

Any and all content on this website is created for inspiration purposes only. Creating with my suggested methods, products, instructions, tutorials, and tools is at your own risk. Please ensure you are following proper guidelines with anything used, and seek professional advice if you don’t know how to do something.

Old Salt Farm is for entertainment purposes only. All tutorials and demonstrations are not intended to be professional advice, nor substitute as such, and I make no guarantees as to the procedures and information here.

Read my full disclosure here.

AMAZON DISCLOSURE

Kierste Wade (Old Salt Farm) is a participant in the Amazon Services LLC Associates Program, an affiliate advertising program designed to provide a means for sites to earn advertising fees by advertising and linking to amazon.com. Amazon offers a small commission on products sold through their affiliate links. When you make a purchase after clicking on one of those links, I earn a small commission that helps support this blog, at no extra cost to you. Read my full disclosure here.
Copyright © 2021 Old Salt Farm, Custom site by Moonsteam Design.

Cookies

This website requires the use cookies. By using this site, you are agreeing to our Privacy Policy.