• Home
  • Blog
  • Project Gallery
  • About Me
    • About Old Salt Farm
    • Contact Info
  • Terms of Service & Privacy Policy
  • My Book
    • Email
    • Facebook
    • Instagram
    • Pinterest
    • Twitter

Old Salt Farm

Farmhouse + DIY

  • DIY
    • DIY Home Decor
    • Paint & Stain Projects
    • Re-purposed Projects
    • Woodworking
    • Outdoor Projects
  • For the Home
    • Old Salt Farm
    • Farmhouse Style
    • Home Decor & Styling
    • Cleaning
    • Organization
    • Entertaining
    • Crafts
      • Printables
      • Fonts
      • Silhouette
      • All Crafts
      • Kids’ Crafts
  • Holidays
    • 4th of July
    • Back to School
    • Christmas
    • Cinco de Mayo
    • Easter
    • Fall
    • Halloween
    • New Year’s Eve
    • Spring
    • St. Patrick’s Day
    • Summer
    • Thanksgiving
    • Valentine’s Day
    • Winter
  • Family Life
    • Kids’ Ideas
  • Gift Ideas
    • Birthdays
    • Father’s Day
    • Mother’s Day
    • Teachers
    • Thank you
    • Thinking of You
    • Weddings
    • Babies
  • Lifestyle
    • Travel
  • Recipes
    • Appetizers
    • Breads
    • Breakfast
    • Crockpot
    • Cookies & Bars
    • Desserts
    • Main Dishes
    • Soups
    • Snacks
    • Drinks
    • Holidays
    • Game Day
  • The Farmhouse Finder
  • Shop

Jan 14, 2014

Barn door baby gate

UPDATE:  I‘ve had some comments about how far up the door is, and that a child’s head could get stuck underneath it.  The good thing is, you can place your door anywhere you want it! :)  For your baby or pet’s safety, I would definitely suggest not having it any higher than 2-3 inches off of the stair. When we first installed it, we didn’t realize how far up it was, and it was a super easy fix. I just happened to take pictures of it right away!  All babies were (and are) fine.  :)

Yes, the zip ties do hold them on, and they have worked really well.  I would suggest the HEAVY DUTY ties–we ended up switching out the black ones for thicker, heavier ones, and they worked great!  We only did that because we didn’t want to ruin our banister, but you can also anchor the gate to the walls if you have that option.

—-

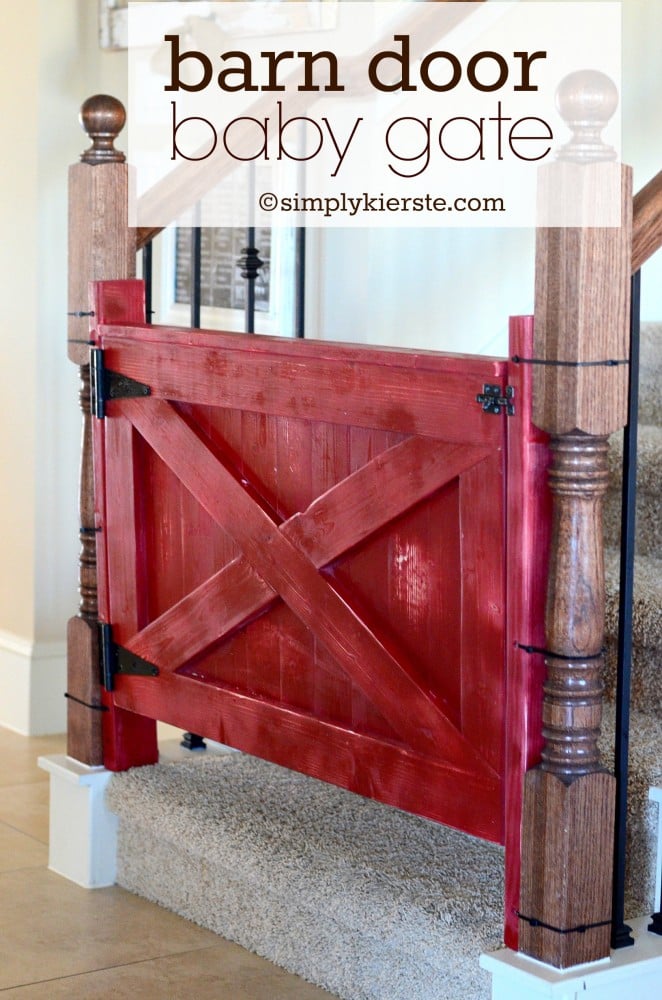
Baby Caroline started crawling (sniff, sniff) a couple of months ago–much earlier than I expected her to.  It’s so funny–with my first baby, I couldn’t wait for him to crawl and walk, but by now I realize that mobility comes at a price.  :)  We have stairs in our house, right in the kitchen area, and where we spend the majority of our time.  At the bottom of the stairs is tile, and if she fell, it would really not be good.  I want her to learn how to do stairs–I think it’s important-but only if I’m right behind her to catch her.  So…it was time for a baby gate, and what could be cuter than one made from a barn door?

barn door baby gate | oldsaltfarm.com

Yes! I love love love it!

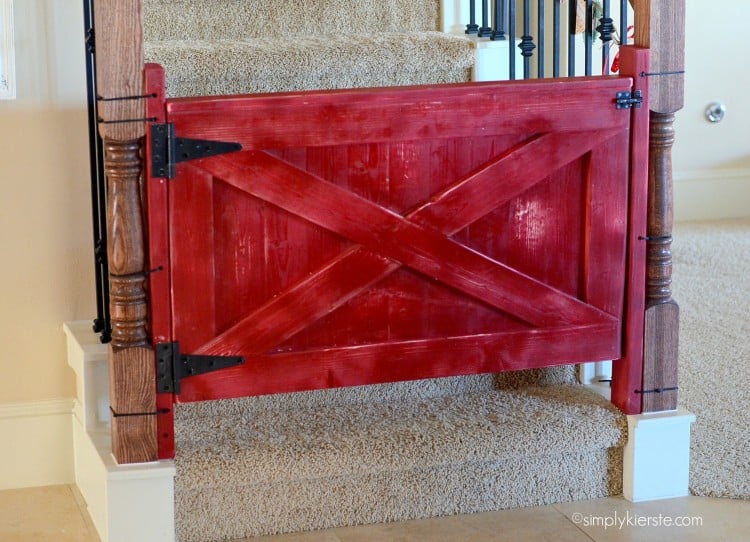
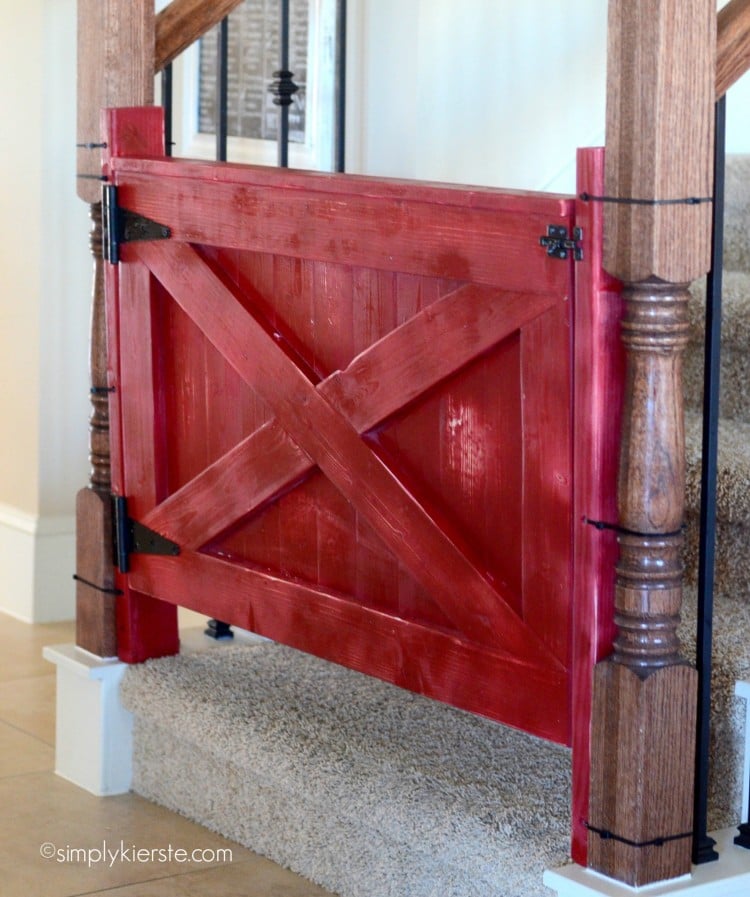
You’ll see the black ties around the posts–we decided to give those a try so we could attach the gate to the posts, instead of having to go up a couple of stairs for it to go into drywall. So far so good!  I went back and forth on color–we just bought our house and it’s all builder’s beige (which I can’t wait to change!), so it really needed some color somewhere. I’m so glad I went with the red–it’s the perfect pop of color in my kitchen/family room area.

Good news…they are easy to make!  Here’s how we did it:

SUPPLIES: (affiliate links included below)

-2×4 board

-1×4 boards

-1×2 board

-wood glue

–nail gun

–miter saw/chop saw

– 2-8 inch extra heavy T-hinges

-window bolt

-spray paint

{barn door directions}

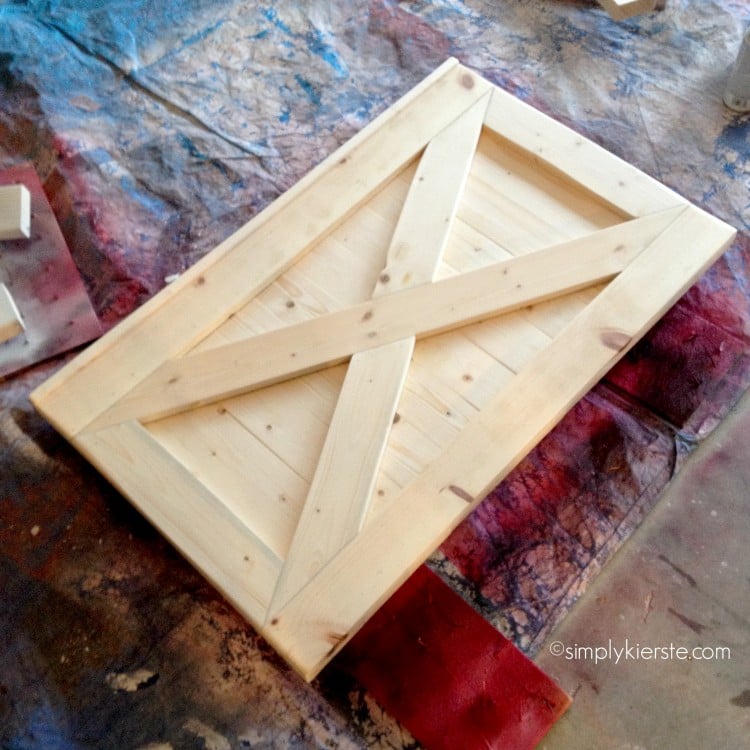
1.  Measure your space for the width, and decide how tall you want your gate to be.  Cut enough 1×4 boards to fit that measurement and line them up.  Remember, 1×4 boards aren’t really 4 inches in width–more like 3.5 inches, so you need to consider that when figuring out how many you’ll need.  We needed 39 inches, so we had to cut one last board on the end a little thinner to make it the right total width. I bought the rougher boards (not the select pine), because I knew I was going to distress it, and they are SO much cheaper than the select wood.  Just know there are options when buying wood, and your budget and end result will both be factors!

2. Once your boards are lined up, cut another 1×4 to go across the bottom, and one across the top.  Attach them with wood glue, then a nail gun.  Cut two boards–one for each open space on the sides (it will about 7 inches less than the height of the baby gate, since you already have the boards across the bottom and top).  Repeat with the wood glue and nail gun.

3.  For the “x” in the middle, a sliding bevel is key to helping you get the right angles!  They aren’t very expensive, and if you plan to do other projects with angles (including frames), it’s a really great tool to have on hand. Once you have them cut,  once again, use wood glue and a nail gun to secure it in place.  We wanted a finishing piece on top of the gate, so we added a 1×2 along the top, to give it a little bit of a lip. You don’t have to–whatever you like!

barn door baby gate | oldsaltfarm.com

You’ll see our sides are a little different–instead of the side boards being flush against the bottom and top boards, we have our “x” into that space.  That’s only because we changed plans midway through the project and didn’t want to start over. You’ll want to have your side boards go from top to bottom, with the x in the middle–it’s too many angled cuts otherwise, and it’s not necessary. I just wanted to point it out in case you wondered about it!

4. Sand all the surfaces really well to finish it, wipe off the extra dust, then paint as desired. I used Rustoleum’s Colonial Red/Satin Finish.  I then went over it with a power sander and medium grit sandpaper to rough it up and make it distressed.

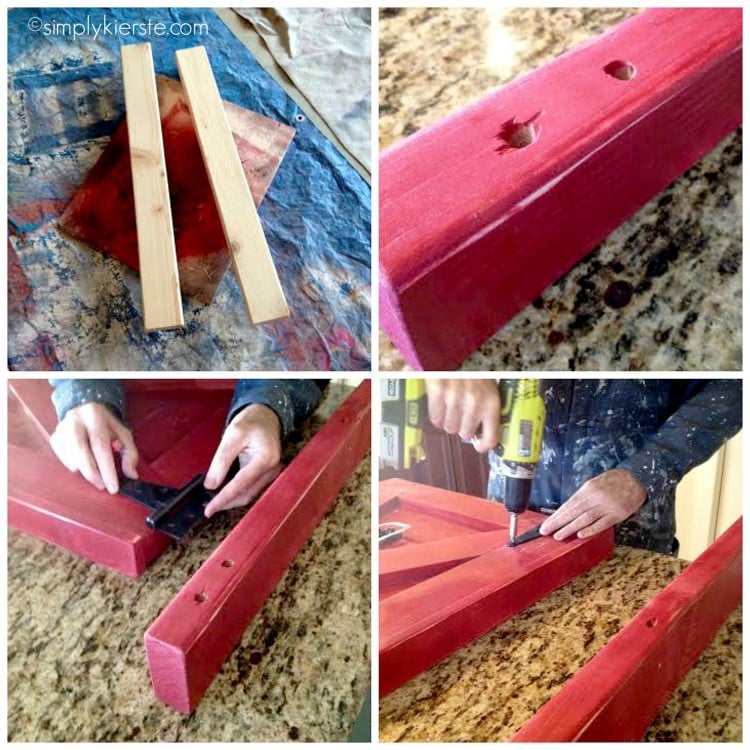
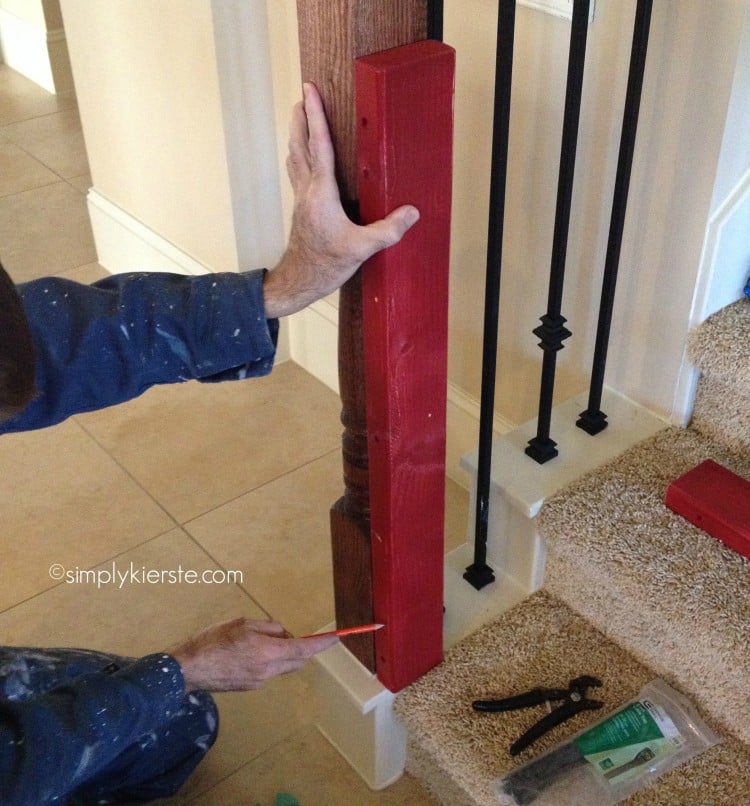
5. In addition to the barn door, you will also need two pieces of 2×4 board that have been cut a little bit taller than your gate.These are your brace pieces, and help keep the gate up. You will either screw these into the wall (find a stud), or zip tie them onto your stair posts.  If you plan to use the zip ties like we did, you’ll need to pre-drill holes at the top, bottom, and middle of the board for the zip ties to go through and tie onto the banister.

INSTALLATION DIRECTIONS

1. Once the door was finished, it was time to install the hardware. We used a drill to attach our heavy duty hinges to the door. (see link to what we used in the supplies section)

2.  We stood our 1×4 brace pieces against the inside of each post, and slipped our zip ties into the pre-drilled holes, then used Robogrips to tighten them as much as possible.

4.  We attached the window lock next–it has two pieces, on for the brace piece on the right, and one for the door itself.  You can use other locks if you like, but we knew this one would be secure enough for those that shouldn’t be opening the door, but easy for this who should be.  ☺

barn door baby gate | oldsaltfarm.com

barn door baby gate | oldsaltfarm.com

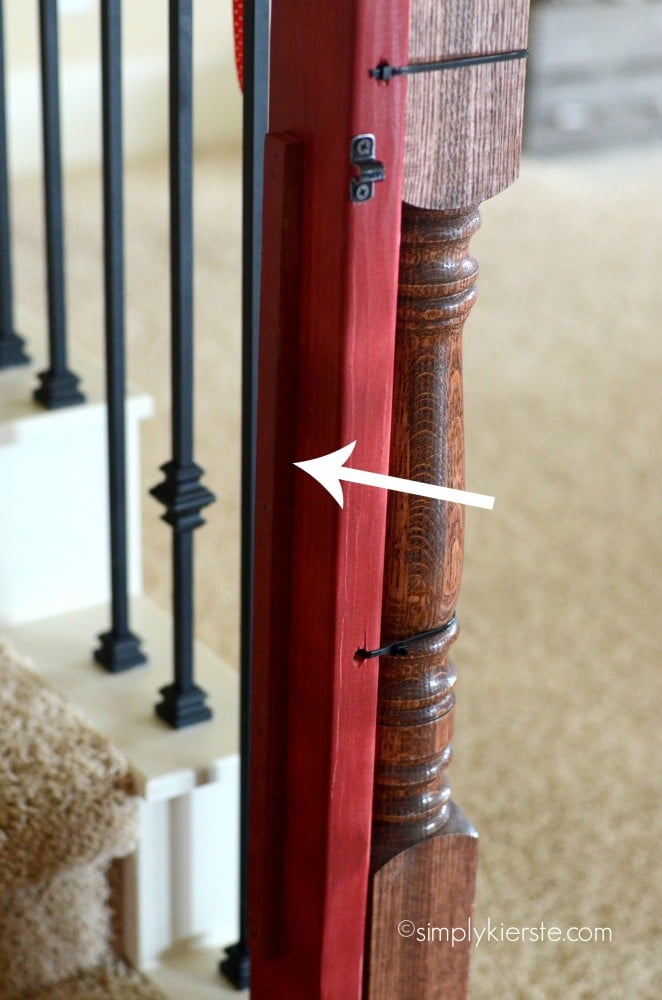
5. Lastly, we attached a small strip of wood on the inside of the brace on the right, so the door wouldn’t swing past that point, and get caught on the stair behind it.

barn door baby gate | oldsaltfarm.com

And we’re done!!!

barn door baby gate | oldsaltfarm.com

barn door baby gate | oldsaltfarm.com

kierste signature


Share and save for later!

  • Share
  • Email

Filed Under: All Crafts, Crafts, DIY, For the Home, Furniture, Kids' Ideas | 50 Comments

« Previous post
Next post »

Lovely comments

  1. Kelly Boettcher says

    Jan 14, 2014 at 7:18 pm

    Oh my… I love this! I do not need one for babies, but have a swinging baby gate in a hallway to keep the dogs out of the cats bathroom (food & litter are in their). This would look so much nicer.

    Reply
    • simply {kierste} says

      Jan 15, 2014 at 12:34 am

      Definitely works for pets as well as babies!!! Thanks for stopping by!!! xoxo

      Reply
  2. Justine Y says

    Jan 14, 2014 at 10:02 pm

    Oh my gosh, I love this! What a great idea! Totally pinned! :)

    Reply
    • simply {kierste} says

      Jan 15, 2014 at 12:33 am

      Thank you so much! And thank you for dropping by and pinning. :) xoxo

      Reply
  3. Toni says

    Jan 14, 2014 at 10:59 pm

    Love this! Ive seen these but thought im glad we don’t have stairs, but we do off of our back porch! This could be so cute out there too :) Thanks for posting!

    Reply
    • simply {kierste} says

      Jan 15, 2014 at 12:33 am

      I’ve wanted to do this for years, but haven’t had the stairs that worked, and now I do!! I think a back porch gate would be darling!

      Reply
  4. Bliss says

    Jan 15, 2014 at 8:10 am

    I love it! We used zip ties for ours too, works excellent. Pinning.

    Reply
    • simply {kierste} says

      Jan 15, 2014 at 10:31 am

      I’m so glad to hear that you use zip ties and that they are still working for you! We haven’t had ours up too long, so thank you for sharing!!! xoxo

      Reply
  5. Ruth S, says

    Jan 15, 2014 at 9:23 am

    How ingenious to use zipties to attach it to the posts, so you wouldn’t have to drill into the newel posts!

    Reply
    • simply {kierste} says

      Jan 15, 2014 at 10:32 am

      I can’t take credit for it–I saw it somewhere else with another type of baby gate, and knew I had to try it! Thanks for dropping by!!! xoxo

      Reply
  6. Brooke says

    Jan 15, 2014 at 9:45 am

    This is so cute and classy! Do you have any idea what the total cost was?

    Reply
    • simply {kierste} says

      Jan 15, 2014 at 10:34 am

      We bought all of the supplies along with the supplies for another project, so I don’t have an exact amount, but I can give you an estimate. We spent around $17 for the hardware, and about $30ish for the wood. I already had the spray paint, wood glue, nails, etc., so right around $50!

      Reply
  7. Charity Geiger says

    Jan 15, 2014 at 12:35 pm

    MUCH better than a plastic baby gate! This is such a great gift idea too :) Thanks for sharing!!

    Reply
    • simply {kierste} says

      Jan 15, 2014 at 4:03 pm

      It would be darling gift! Great idea!!! xoxo

      Reply
  8. Whatever DeeDee Wants says

    Jan 15, 2014 at 3:42 pm

    That is brilliant! It looks amazing!

    Reply
    • simply {kierste} says

      Jan 15, 2014 at 3:57 pm

      Thank you SO much!!! xoxo

      Reply
  9. Sally W says

    Jan 15, 2014 at 7:08 pm

    I have grandbaby #1 on the way and I have to start thinking about this – – great idea! I love the way you fit the X in the frame. It looks very creative and unique!

    Reply
    • simply {kierste} says

      Jan 16, 2014 at 12:56 pm

      Thank you so much, Sally!!! xoxo

      Reply
  10. Jennifer @ Decorated Chaos says

    Jan 16, 2014 at 12:33 pm

    Oh Kierste! This is super cute and creative. I love it! …..posting to my DIY board.

    Reply
    • simply {kierste} says

      Jan 16, 2014 at 12:56 pm

      Jennifer, thank you!!! I’m so glad you stopped by!! xoxo

      Reply
  11. Amy says

    Jan 19, 2014 at 1:50 pm

    what a BEAUTIFUL baby gate! Love it!

    Reply
    • simply {kierste} says

      Jan 20, 2014 at 7:58 am

      Thank you so much!!! xoxo

      Reply
  12. April says

    Jan 20, 2014 at 10:21 pm

    Would it be wrong to dress them up in a cute little animal costume using this?? :-)

    Reply
    • simply {kierste} says

      Jan 20, 2014 at 11:53 pm

      Lol!!!

      Reply
  13. Laura | Artifact Uprising says

    Jan 30, 2014 at 1:39 pm

    This is beyond adorable! Such an amazing way to disguise this in your house. Thank you so much for sharing!!

    Reply
    • simply {kierste} says

      Jan 30, 2014 at 9:09 pm

      You are so welcome!! Thanks so much for stopping by!!

      Reply
  14. capturing joy with kristen duke says

    Mar 10, 2014 at 9:18 am

    THis is FAB, I love it!!

    Reply
    • Simply Kierste says

      Mar 11, 2014 at 9:23 am

      Kristen, thank you!!!

      Reply
  15. Lolly Jane says

    Mar 10, 2014 at 9:24 am

    Wow, that door is gorgeous. LOVE it!!!

    Reply
    • Simply Kierste says

      Mar 11, 2014 at 9:23 am

      Thank you, cute Lolly Jane girls!!!

      Reply
  16. Robin says

    Apr 19, 2014 at 2:50 am

    We don’t have posts :( have you figured a way to keep it up between walls? :)

    Reply
    • Simply Kierste says

      Apr 20, 2014 at 3:56 pm

      Yep! Just screw the side boards of the baby gate (the side boards that are attached to my posts) into the studs of your wall. Make sure it’s in the studs, because it’s really heavy. That was our plan if the zip ties didn’t work. :)

      Reply
  17. Katie says

    Apr 29, 2014 at 10:41 am

    Ahhh I love everything about this baby gate. So much more stylish than the jail looking like ones you get in the store. We had a 1 month old and plan to make a baby gate in the coming months.

    Reply
    • Simply Kierste says

      Apr 30, 2014 at 8:06 am

      I totally agree about the jail baby gates. :) Let me know when you make it, and how you like it!!! xoxo

      Reply
  18. Jess says

    Aug 1, 2014 at 2:26 pm

    Hi! I loved this so much I tried to make it this afternoon! However, your instructions say that the post boards are 1×4’s and it looks like they are actually 2×4’s. Sadly, I just made this entire thing with measurements for a 1×4 there. My hardware won’t fit on that size and I don’t believe it’s strong enough to hold this heavy gate. Not your fault, I should have guessed that’s what it was, but you might want to update the instructions. If I am wrong, please correct me! I would love to be wrong here and then my project can be saved… :) Thanks for the inspiration.

    Reply
    • Simply Kierste says

      Aug 1, 2014 at 2:35 pm

      I’m so sorry your hardware doesn’t fit! We actually did use 1×4’s! You can see that all around the edges of the gate, the wood is double stacked, making it thick enough to add hardware. If we had used 2×4’s, and stacked them on top of each other like that, it would have been way too heavy to hang. We added the latches at the top and bottom of the gate where it was double stacked, to give us the ability to add the hardware. I linked to the hardware we used, and bought at Home Depot–it worked perfectly! If you have any other questions, please let me know–and I hope your project can be saved! :)

      Reply
  19. Kayla says

    Sep 1, 2014 at 9:02 pm

    I think what Jess was referring to is the posts that where zip tied. Those look to be 2×4’s not 1×4’s. The gate itself has 1×4’s on it. I may be wrong but that is what it looks like to me.

    Reply
    • Simply Kierste says

      Sep 3, 2014 at 8:37 pm

      Thank you, Kayla, you are both right! I thought she was talking about the actual door. I made the corrections in the directions. xo

      Reply
  20. Natalie says

    Oct 15, 2014 at 11:02 pm

    Hey there, I was looking for barndoors, because we bought a house in the woodlands and the previous owners had them and they looked AWESOME. And you are them! I recognize the little girls room.

    Reply
  21. Tami says

    Dec 31, 2014 at 9:42 pm

    How are the zip ties holding up? I have a third little one on the way and would love to do something like this but we have the banisters too that we don’t want to drill into.

    Reply
    • Simply Kierste says

      Jan 1, 2015 at 8:15 am

      They worked really well!! Just make sure you get the heavy duty ones, and a few extra in case. We ended up adding a couple more, because of how our banister was shaped. Upstairs was the playroom, and that was gate well-used, and it we never had a problem!! Thanks for stopping by! xoxo

      Reply
  22. porkchop says

    Feb 26, 2015 at 7:26 am

    TO BE SURE THE X SO TO SPEAK ON FRONT IS 1X4 S CORRECT
    THE TWO THAT HAVE HOLES BORED IN THEM FOR ELECTRICIAN TIES IS 2X 4 CORRECT
    BUT THE VERY TOP PIECE LOOKS LIKE A 1X6 IT LOOKS WIDER WHERE THE (window bolt) IS correct ME PLEASE
    GREAT PICTURES WHEN YOU STARE AT GATE, MIND GAMES KICK IN THE 1X4 LOOKS LIKE 2X4 THE 2X4 LOOK LIKE 1X4 FIRST GRAND DAUGHTER DUE IN MONTH, I WONT TO JUMP ON THIS, WOULD YOU BE MORE SPECFIC ON WOOD SIZE AND HOW TALL ETC…….
    THANKS FOR ALL YOU DO PORKCHOP IN GA.

    Reply
  23. Jessica Frye says

    Feb 11, 2016 at 10:45 am

    Thanks so much for the tips and idea!!! We followed your directions and ours turned out amazing!!!! I love it!! And we get so many compliments on it!! I wish I could figure out how to share a pic of it on here for you to see!!

    Reply
    • Simply Kierste says

      Feb 11, 2016 at 1:31 pm

      YAY, Jessica!!! I’m so excited for you!! My baby is now two, and I don’t really need mine anymore, but I love it so much I kind of want to keep it up! :) I’d love to see a picture—you can email it to me at simplykierste@yahoo.com!! xoxo

      Reply
  24. Alyssa says

    Jun 20, 2016 at 11:03 am

    What kind of stain did you use? I love this color!

    Reply
    • Simply Kierste says

      Jun 20, 2016 at 1:48 pm

      I always use Dark Walnut by Minwax…it’s my favorite!! :)

      Reply
  25. Lisa says

    Oct 26, 2017 at 9:29 am

    Approximately how much did this cost? This would be great at the top of my stairs. Regular gates don’t stay and the ones you can drill to the wall are too small.

    Reply
    • Simply Kierste Design Co. says

      Nov 1, 2017 at 1:35 pm

      Hi, Lisa! It cost around $50 to make—it depends on how much you spend on the latch hardware, but it’s a pretty reasonably priced project!! It’s still one of my favorites!!

      Reply
  26. Sarah says

    Oct 31, 2017 at 11:16 pm

    I love love love this idea. Just a suggestion though, you may want to consider moving that latch to the back side of the door once she becomes a fast running toddler, and this is totally coming from someone who had 14 stitches between her eyebrow and actual eye at 2 1/2 years old because of a latch on a split barn style door at the babysitters house. ;)

    Reply
    • Simply Kierste Design Co. says

      Nov 11, 2017 at 11:39 pm

      Oh, dear! That sounds terrible! That’s definitely something to consider for those that have a baby gate that’s low enough for a little one’s head to run into it.

      Reply

Leave a Reply Cancel reply

Your email address will not be published. Required fields are marked *

Recipe Rating


This site uses Akismet to reduce spam. Learn how your comment data is processed.


search

COPYRIGHT POLICY

The images, tutorials, and content on oldsaltfarm.com are protected by copyright laws. DO NOT distribute or copy the content without written permission. You may not use any images without permission. DO NOT edit or remove watermarks from any image. Pictures are not to be changed or altered in any way, shape or form without my consent. Please do not copy text or reprint recipes without my permission. All ideas and printables are for your personal use only. By downloading any files or printables, you accept that they are FOR PERSONAL USE ONLY. My patterns, ideas and tutorials are NOT intended for resale or re-distribution.

Interested in sharing one of my photos or projects? Fill out my Old Salt Farm Feature Agreement.

Please contact me with any questions. oldsaltfarm@gmail.com

© Old Salt Farm (Kierste Wade)

CREATE AT YOUR OWN RISK

Any and all content on this website is created for inspiration purposes only. Creating with my suggested methods, products, instructions, tutorials, and tools is at your own risk. Please ensure you are following proper guidelines with anything used, and seek professional advice if you don’t know how to do something.

Old Salt Farm is for entertainment purposes only. All tutorials and demonstrations are not intended to be professional advice, nor substitute as such, and I make no guarantees as to the procedures and information here.

Read my full disclosure here.

AMAZON DISCLOSURE

Kierste Wade (Old Salt Farm) is a participant in the Amazon Services LLC Associates Program, an affiliate advertising program designed to provide a means for sites to earn advertising fees by advertising and linking to amazon.com. Amazon offers a small commission on products sold through their affiliate links. When you make a purchase after clicking on one of those links, I earn a small commission that helps support this blog, at no extra cost to you. Read my full disclosure here.
Copyright © 2021 Old Salt Farm, Custom site by Moonsteam Design.

Cookies

This website requires the use cookies. By using this site, you are agreeing to our Privacy Policy.